Showing posts with label 12x12 Layouts. Show all posts

Tuesday, December 1, 2015

Reminisce Design Team: Wizard 101

Do you know the feeling you get when you find the perfect paper for your vacation photos?

Wizard 101 from Reminisce is the perfect collection for your most recent Florida vacation to theWizarding World of Harry Potter.

 Whether you're a fan of the original "Hogsmeade" park or the newer "Diagon Alley" park at Universal Studios in Orlando, FL you'll want to grab the entire Reminisce Wizard 101 Collection. This on trend collection embodies all of the iconic Hogwart House plaids plus many more familiar images to make scrapbooking your vacation quick, easy, and impressive.
 This 12x12 layout makes use of the 12x12 sticker sheet from the Wizard 101 collection for both the main title and subtitles (above) and also to label all  the Diagon Alley photos (below).

Be sure to check out all of the newest offerings from Reminisce at your local scrapbooking or paper crafting store.

Thursday, May 28, 2015

Echo Park Jack-n-Jill Boy Collection with Shelly

The boy collection of double sided papers, element and alphabet stickers from Echo Park's Jack-n-Jill Collection is amazing to work with due to the diversity in paper designs (bicycles, airplanes, billiards, cameras, maps, plaids, and more!) and great 4x6 card and 3x5 card papers:

 I used my gears die to cut a few embellishments and secured them with antique buttons:
 Create inspirational 4x4 home decor item using the newest stain (edges), foil paper adds a bit of shine:

 Create a 4x6 mini-album for dad for Father's Day (it's just around the corner):
 I used my crop-a-dile to punch holes and set eyelets along the binding and used twine to hold it all together.


Dad will need a card, too, so try this A2 size card using a few of the papers and element stickers for the greeting (I layered three here). Also, I used Tim Holtz ideaology industrious stickers for the two photo corners. 
 I loved the tiny alphabet (therer's a big one two) included with the 12x12 alphabet sticker sheet. 
 Using tiny tweezers, I was able to create this cards greeting. The metal staple from the tiny attacher adds a bit of masculinity to the cards.
Thanks for taking a peak at this month's design team projects for The Scrapbooking Studio, Moline, IL

Thursday, April 30, 2015

Echo Park's Jack-n-Jill GIRL Collection is delightful! Pick up the entire collection NOW at The Scrapbooking Studio, Moline, IL
Check out this cigar box make-over:
 I used Mini Flowers on the cover along with several stickers from the 12x12 Element Sticker Sheet, a die cut butterfly and bling for the flower center and butterfly's body (above) and below I used the backside of the Border Strips sheet to cover the inside of the lid along with a few more element stickers. The bottom inside is covered with Vintage Ads.
 The sides were covered with Jill Floral and I added some border stickers, too. The adhesive I used was 1/4" Sookwang double sided tape in a roll. I think this will be a fun catch-all for cards and trinkets for any young lady.
This 12x12 layout features a "sweet" banner using stickers from the 12x12 alphabet sheet...
 antique and modern buttons tied with twine and bling in the flower centers.
The collection include journaling cards and word stickers:
This A2 size "Thank you" card was created with a cardstock base and uses a 4x6 journaling card as the front. The "Thank You" and butterflies are all die cuts and the butterflies were also embossed and sanded before being inked and layered using a flower brad.
Here are a few more cards using the collection:
 and their insides, too!

Thanks for taking a look at this collection of papers, projects and cards using the Echo Park Jack-n-Jill Girl Collection. Remember, you can pick up this entire line of papers, stickers, and embellishments at The Scrapbooking Studio, Moline, IL. 

Wednesday, October 29, 2014

Simple Stories Frankie and Friends with Shelly Maxwell

 Simple Stories' Frankie and Friends is an full line of adorable Halloween papers, embellishments, and inspiration! I used a black Graphic 45 pocket mini-album to create this light hearted Halloween Mini-Album treat! Check out the sample in the store.
 Sizzix tag dies works great as a back drops especially with a matching brad, arrow stickers, and other sweet treats.
 There are enough brads on the sheet for every envelope flap plus tons more!
 Pop dot die-cut banner pieces and fussy cut icons to create dimension:


This one page 12x12 layout features layers of 5x7 pieces cut from 12x12 papers from the collection along with a distressed title piece held in place with brads.


The second layout created from this collection includes an adorable popped-up jack-o-lantern, title pieces cut from the borders paper and tissue tape:

Use a white chalk pen around the edges of black cardstock, then use a black pen to create faux stitches around the outside border of the paper.
 Slid a few punched banner pieces under one corner to create a festive feel on the card:
Create spooky eyes with tiny enamel dots placed on printed paper:
Grab all of these treats at The Scrapbooking Studio, Moline, IL! Shop on-line: www.thescrapbookingstudio.com or in person at 1623 5th Avenue, Moline, IL 
309-736-7242

Wednesday, August 13, 2014

Graphic 45 Botanical Tea Layout Samples

Graphic 45 Botanical Tea Collection contains numerous double sided papers, cardstock stickers, and lots more. I found the collection easy to work with and thought it contained a great deal of options with both large and small print papers, dots, stripes, border strips, journaling pieces, and more.

 Today I would like to share two 12x12 layouts I created using the collection:
This 12x12 Botanical Tea paper lends itself to great focal pictures. I used a light house picture I took recently while in Two Rivers, Wisconsin along Lake Michigan's west coast.
 I used pointy scissors to cut the printed postage stamps and then tucked my brown distressed photo mat and picture under the stamp image:
The same technique was used for the printed rose image lower right of the photo.
I added additional punched flowers, with wooden buttons tied with ribbon centers. A chipboard canvas covered butterfly colored with Distress Markers and Spica Glitter pens, and bling for the butterfly's body was also added for dimension on the page.

The second layout was created using several strips of paper and a border strip, one 4x6 photo and four 2x2 photos.
  I punched, inked, layered and pop dotted  several more flowers for this layout and placed them below the photos.
Tim Holtz Kraft Core Nostalgic Collection was used for the title piece. I dry embossed it using an embossing folder and then inked it with Distress Ink and a blending tool. I used American Craft Bones thickers for the Title. Tim Holtz tissue tape (butterflies) was used along the right side of the page for additional embellishment.
Thanks for taking a look at these layout projects created with Graphic 45's Botanical Tea collection.  I'll be sharing one more project I created with this collection very soon, so stop back and check it all out. The Botanical Tea Collection is available at The Scrapooking Studio, Moline IL or you can order it onnline: www.thescrapbookingstudio.com  along with a lot of other great products that are also available online.

Tuesday, July 1, 2014

"Public Library" October Afternoon with Shelly Maxwell

I was so excited to get to work with "Public Library" line of product from October Afternoon for my July Design Team projects for The Scrapbooking Studio in Moline, IL! I used my great-niece Julia as the centerpiece of my project (below), a trip to the Memphis Zoo on the two-page layout, and got a little crazy on some cards. Check it all out here:
 The 12x12 wall hanging is on a Tim Holtz Ideaology Canvas . I used a 4x6 black and white photo matted on gold vellum paper (Photo by Audrey Olson Photography). Red Stickles were used to highlight the letter"J" in three places on the canvas because my niece's name is "Julia"
 
 I fussy cut several different words and images from the "Public Library" line of papers to acquire all the little pieces I wanted to include for Julia. For example, the word "dream", a scalloped border,  a dog (they have three in their family), a deer head (because her dad loves to hunt), lots of flowers and butterflies. The images included on the pages of this line of double sided papers are incredible! A tiny Prima flower colored with Copics was placed over the picture of a flower on Julia's head. (She always has in a hair pretty).
 The brads that are part of "Public Library" worked great as flower centers along with a few Bella Blvd. text black button. 
 Maya Road pins, Canvas shipping tag, wooden ruler, and Petaloo flower are all part of the cluster lower right. I used a weR perfect 8 6" punch to create a 6x6 matt behind the picture.
 We traveled to Memphis, TN over spring break in March 2014 and we had a great time. The Memphis Zoo is wonderful. Julianne and Charlie were able to take in a camel ride for only $5. What a great opportunity. The Freckled Fawn wooden picture frame colored with Squeezed Lemonade Distress Ink works as a great focus for this picture. Emma Thickers in glitter gold create the title on a "Public Library" journaling card. 
 Maya Road tickets were the perfect embellishment to use to emphasize the "Zoo" theme as we had to purchase lots of tickets throughout the day.
 I love the card catalog paper and used it as a lower border across the bottom of the page. Not all learning comes from books, the really good stuff comes from experiences!
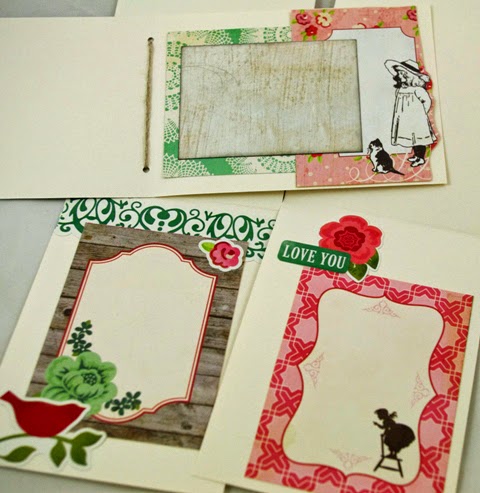
Four cards complete this month's collection of projects from "Public Library" by October Afternoon. "Public Library" journaling cards serve as the background on two of the cards while papers and real wood thin birch is the back drop on one card as well.
 I used Distress Ink in Squeezed Lemonade, Peacock Feathers , and Brushed Corduroy to color the real wood thin birch used as a card mat on this birthday card. I also die cut the wood too, which worked great. It adhered to the paper with my regular 3L tape runner adhesive just great.
 "Public Library" tidbits and brads embellish this wooden pennant:
 Maya Road Canvas shipping tag (stamped with the word "Inspire") and embellished with a bit of ribbon, brad and tidbits.
 Next to the canvas tag is a Maya Road stick pin with two Maya Road wooden spools wrapped in papers from "Public Library" and a bit of toole to hold the spools in place. I attached these to the card with glue dots. I think this is a great card to share with a teacher or educator.
 Bella Blvd. Text Black buttons, Public Library Brad, and journaling cards complete this inspirational card appropriate for many occasions such as birthday, congratulations, or just to say, "Hello".
 And lastly, I would like to share a 5x5" card embellished with papers, journaling cards, tidbits, brads, Petaloo flower, Maya Road wooden ruler, and Emma thickers. It is a pretty little card perfect for keeping in touch. Thanks for taking a look at this month's projects. Remember, you can pick up all of these exciting items at The Scrapbooking Studio, Moline, IL.