Showing posts with label MME. Show all posts

Monday, June 23, 2014

Market Street Layout, Cards and Banner

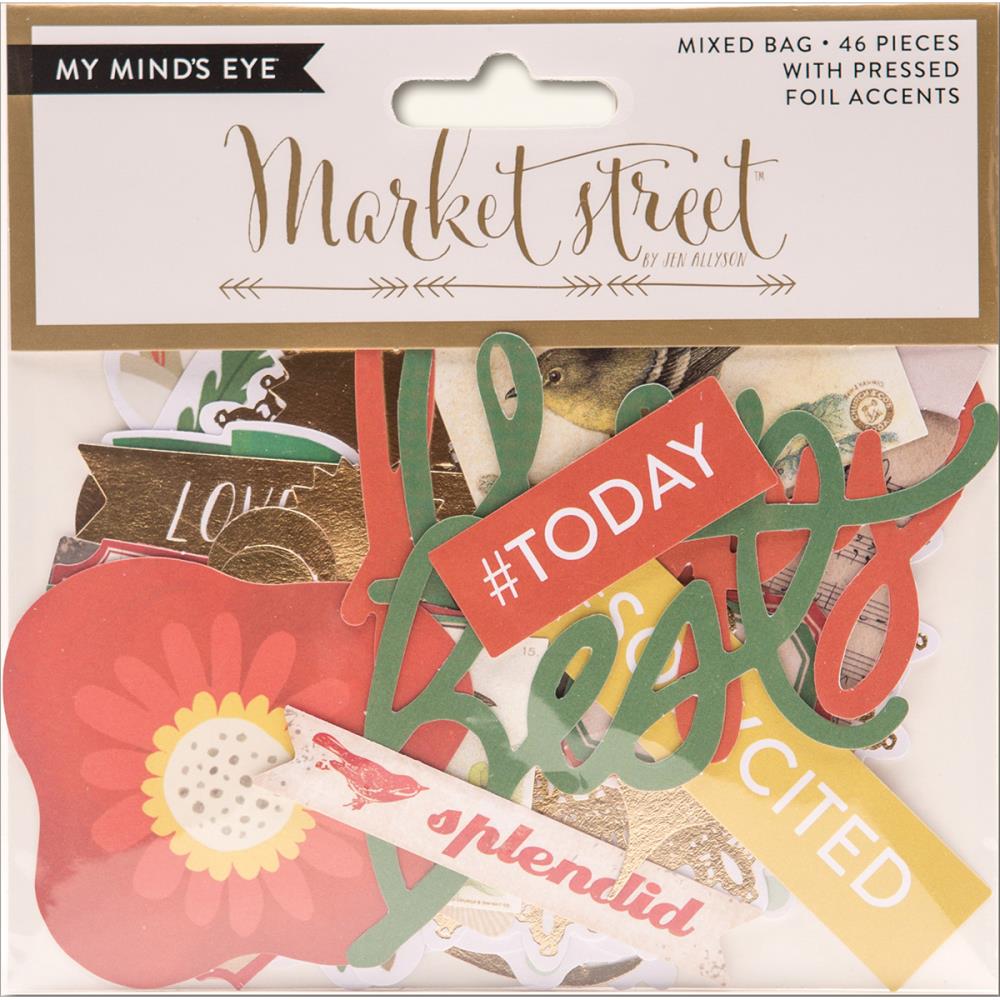
Summer has finally arrived and the Market Street papers, die cuts, foil papers, chipboard pieces, and buttons from My Mind's Eye are a great way to capture your warm sunny memories in the trendiest style. You can grab your entire summer stash at The Scrapbooking Studio in Moline, IL. This layout created with pictures from a 2010 Wisconsin trip came together elegantly and with all the current style thanks to MME's "Mixed Bag"-a 46 piece collection of die cuts, words, journaling spots, and really unique foil accents. In addition to the cursive words from the Mixed bag, I also used American Craft Thickers to create the title. (Emma in Gold). 
 Gold vellum paper is used as a photo mat coupled with a gold foil doily and...
 heart sticker taken from the Nob Hill Label Stickers sheet.
 Chipboard pennant pieces create a tiny banner just below the title. Die cut flowers-popped with dimensional foam stickers give the layout a little bit of depth paired with a foil leaf and foil swirl to add balance to the right side of the layout. The floral background piece (1/2 on each page) was cut down to 11x11, corner punched with the weR Mini 8 Punch (Flourish), and cut in half to create the two background mats.
 The MME Market Street Nob Hill label stickers (70 pieces) offer great inspiration for cards:
 Check out the hippest mustache motif that runs through this entire line...
A moose with a mustache?
A wooden light bulb embellishment (Maya Road) colored with Distress Markers are the focal point of a foil, vellum and paper layered flower in the upper left corner of this card. It is perched on top of a wooden "Hello" frame from Freckled Fawn.
 This card base is a gorgeous black with gold polka dots that is very glamorous! I've folded back a corner of the mat and tucked a Maya Road pin (colored with Copic markers to match the paper line), wooden spool with paper wrapped around it, and tool for a dimensional accent. The bow, foil leaf, foil medallion, and music are all taken from the Mixed Bag that is part of the MME Market Street Collection. The doily is actually a piece of die cut Real Wood Thin Birch from Creative Imaginations colored to match with Copic markers.
 And the last card I wanted to share with you also features a bit of the Real Wood Thin Birch from Creative Imaginations-but his time I embossed it with an embossing folder. The "Thank You" is a sticker from the Nob Hill Sticker sheet.
 The Banner below features several pieces of the double sided papers from the Market Street Collection from MME, as well as their button (pins), chipboard buttons, Maya Road tiny clothespins, wooden light bulbs, Petaloo Flowers, doily die cut Real Wood Thin Birch from Creative Imaginations and colored with Distress Ink/blending tool, and lots more.
 The Maya Road wooden light bulbs take the Distress stains very well! The "learn" sticker stayed on even after the piece was stained.
 I love this button (and so did my kids) that is attached to the wooden doily I mentioned earlier in the post.
Thanks for spending a bit of your day checking out all that the MME Market Street Collection has to offer. You can pick all of this up at The Scrapbooking Studio, Moline, IL.


Sunday, November 24, 2013

MME Vintage Christmas Design Team Layouts, Mini-Album, and Cards!

I would love to share some layouts, a mini-album and cards designed with MME's Vintage Christmas line of papers, stickers, dimensional stickers, tags, brads, and more (all available at The Scrapbooking Studio, Moline, IL):
 MME Vintage Christmas
 These 12x12 layouts (above and below) of my children Julianne an Charlie with our dog, Blake, went together quickly and look great thanks to the beautiful rich colors and easy to design with pages by MME.

 This super chunky mini-album feels great in your hands-it's wooden and from Kaiser. I used Washi tape around the edges and adhered the paper to the pages using a tape roller, then sanded the edges using the Tim Holtz sanding tool.
 Tiny jingle bells on the front cover give the album a layer of sound along with the visual layers created with dimensional stickers and ribbons.


 I die cut and matted with the same shape for some of the pictures.
 The diversity of the shapes and sizes of stickers that accompany this line of product allows the user lots and lots of choices for card fronts and insides. These two went to gether quickly with the inspiration from the papers, wooden buttons and washers, twine, ribbon, and brads.


Thanks for taking a peak and don't forget to stop by the online store or the Moline location of The Scrapbooking Studio to pick up all your Christmas goodies!

Friday, September 28, 2012


Shelly here with a card to share with you. I had a lot of fun creating this card using an ACCUCUT die, and the Lavender line of papers from My Mind's Eye. The collection is stuffed full of adorable sentiment stickers, gorgeous brads, pennants, and papers from the Lavender line of papers from My Mind's Eye.
Grab a MME sticker sheet, a sheet of paper and create a gorgeous card!

Wednesday, August 29, 2012

{Tips and Techniques} Acrylic Embellishments
By Shelly Maxwell
Posted Image
Ever wonder what to do with acrylic embellishments? Hi! Shelly here with some fun tips and techniques you can try on acrylic to really make your card, embellishment or altered item really stand out.

I've chosen to work with a collection of circle acrylic icons from a package offered by Fancy Pants Designs to work with on my 6x6 card. I used a mixture of butterfly and flower shapes.

First, I painted with acrylic paint around the outside edges of the circle and on the inside edges of the butterfly. I used a Sharpie marker to draw lines around the butterfly to enhance the outline. Jet Black Staz On ink on the small heart and a MME brad for the butterfly's body.
Posted Image
Copic markers work REALLY WELL on acrylic! I used a brown and yellow to create the sunflower here:
Posted Image
Next, I used Adirondack alcohol inks on a felt applicator with blending solution and dabbed it on the backside of the green flower (lower left card front) and a sprayed mixture of Ranger reinker dye ink + water + Perfect Pearls on the small inner flower, fluttering butterfly, and blue flower shown here:
Posted Image
Again, I used the brown Copic Marker to color the tiny heart and a Sharpie marker to draw faux stitching lines around the outside of the flower.

HINT: Run the acrylic pieces through your Xyron so that no adhesive is seen from the front of your project. Use glue dots for things like the dimensional butterfly.

Try creating something fun with acrylic today! You will love the possibilities it offers to the creative crafter!
Posted Image
The Fancy Pants acrylic set includes arrows, hearts, tabs, and enough acrylic pages to complete to mini-albums.

The best news is the acrylic is on sale:

Fancy Pants Transparent Diecuts - $5 from $14.99


Posted Image

Posted Image
Acrylic Pieces:Fancy Pants Designs Clear Mix & Match transparent die cuts
Inks/Pens/Paints: Staz On Jet Black InkAdirondack Lettuce Alcohol InkBlending Solution, Copic Markers Honey Y38 and Cashew E79, Adirondack Lights Acrylic Paint Snow Cap
Adhesive: XyronGlue dots
Paper: My Minds Eye The Sweetest Thing Collection: Stickers, Lavender "Fabulous" Flowery Paper, Lavender Collage paper 

Monday, July 23, 2012

{Class} "Cherish" Butterfly Mini-Ablum


"Cherish" Butterfly Mini-Ablum

By, Shelly Maxwell      
Sunday, August 29, 2012 2-5pm  Cost $29.00/kit
Adorable and pretty is the way to describe this seven-page butterfly shaped mini-album that uses My Mind's Eye papers and embellishments and Jillibean Soup's blue currogated butterfly mini, along with yards of gorgeous ribbons! You'll learn how to ink using Ranger's Distress Ink, use Ranger Stain on the mini-album pages, stamp on sticky-back canvas, patterned paper layering, and use Ranger's tissue tape to create a pocket to hold all of your memories and memorabilia! Nearly all paper cutting is done before class by me so that we can focus on techniques and getting the album completed during our time together. Class kits include project photos, instructions, mini-album, photo mats, embellishments, ribbons, pins, twine, buttons, die cut shapes and more!
Bring to class: Adhesive (tape runner, glue dots, pop dots),  paper trimmer for photos, Ranger blending tool if you have one or use mine along with two foam applicators for Dristress Ink in Iced Spruce & Peeled Paint, a craft sheet to work on at your spot.


Register Today! There are only a few seats available for this class due to supply quantities. Call The Scrapbooking Studio to register: (309) 736-7242
The Scrapbooking Studio, 1623 5th Avenue, Moline, IL 61265