Showing posts with label Sizzix. Show all posts

Thursday, May 28, 2015

Register now for Copic Card Class: June 10, 2015 6-8PM The Scrapbooking Studio Moline IL

Please join me, Shelly Maxwell, on Wednesday, June 10, 2015 6-8PM
The Scrapbooking Studio
1623 5th Avenue
Moline IL 611265
Call 309-797-2403 to register
$21/Kit-Value Added item this class only: Hex Chart included with every order! 
What's a hex chart?
Check it out here.
 We will create five cards using Copic markers, the newest Sizzix dies and stamps, Mama Elephant dies and stamps, and more. Don't miss out on this informative and fun evening.
 Get ready for "Pop" on Father's Day,
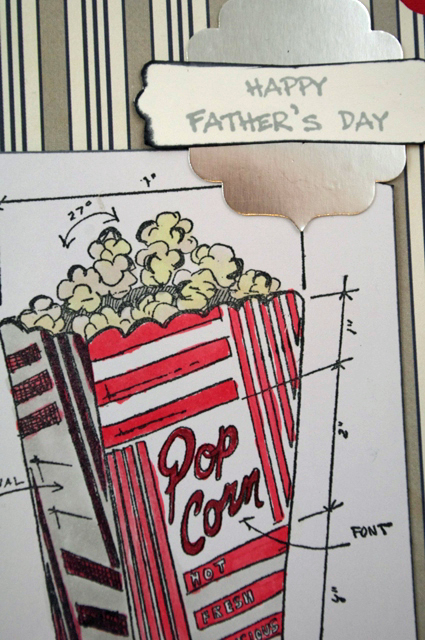

 Practice coloring hair and faces using Copic markers:

Along with your favorite adhesive, pop dots, glue pen, and glue dots, please bring the following markers to class with you: E00, E11, E31, E55, E21, E23, R35, R39, W3, W5. We will also be using these markers; but not as much so you may borrow mine if needed: RV23, RV25, B01, BG02, Y13, Y35, YR14, G00, G03, G07, Y000, Y00, G00, T1, T2, T3, T4, T5, T7, C4, C5, C7 Y32, Y35, E25, R20, E40, E41, E42, E0000, E000, BG90, BG93, E17, E18, B000, B00, B24, R05, BG10, BG11
Wink of Stella-Clear, Distress Ink Fossilized Amber, Black Soot and Walnut, Silver Spica Pen, Red Cat Eye, tiny attacher stapler. Remember, if you don't own all of these markers, you may borrow mine during class.
Register today! 309-797-2403

Tuesday, October 28, 2014

Copic Christmas Card Class-Wednesday, Nov. 5, 2014 6-8 PM

Join me, Shelly Maxwell, at
 The Scrapbooking Studio: 1623 5th Avenue, Moline, IL on
 Wednesday, Nov. 5, 2014 from 6-8PM 
to create five Christmas Cards and
 one adorable muslin bag using
 Copic and Spica Markers.
Cost/$20
 We will be using Clear Rock Candy glitter and glue pens along with Copic to create this Card:
 The newest tag and Holiday Words: Block from Sizzix and Tim Holtz Alterations, and Stampendous stamps to create this card:
 Inky Antics stamps and honeycomb papers to create this 3D ornament card:
 Stampendous stamp, SRM muslin sack and Copics to create this holiday gift bag featuring Copic White and snowman coloring techniques:
 Create this adorable tri-fold key hole card with dimensional die cut Penguin:
 Create this poinsettia themed card using SRM's small white doilies, gold paper, and more!
All of the fun starts at 6pm on Wednesday, November 5, 2014. You'll want to reserve your spot as the Christmas Copic Card class usually sells out. Here are the class supplies you will need to bring with you: Your favorite tape runner adhesive along with large and small pop dots, glue dots, glue pen,  pointy scissors, Vintage Photo Distress Ink and Blending tool, Metallic silver pen. We will be using the following Spica Pens in class: Silver, Olive, Mint, Melon, Turquoise, Gold, Lipstick, Orange, Sand. Please bring the following Copic Markers to class with you if you own them: R02, R05, R30, R35, R39, YG61, YG67, YG91, YG95, YG97, YG99, Y00, Y02, Y08, W1, W3, Y28, C0, C2, C5, Black, Colorless Blender, E00, E02, E11, E13, E15, E19, T1, T3, T5, G82, G85. If you don't have all of these Copic or Spica markers, you may borrow mine during class. All kits include instructions and color photos for the easiest assembly at home. 
Call to The Scrapbooking Studio to 
Register for Class: 309-736-7242

Tuesday, January 14, 2014

Valentine Projects with Echo Park's "Head Over Heels" Collection by Shelly Maxwell

 You will be able to create to your heart's content with this versatile line of double sided papers. The collection is HUGE and offers great inspiration including journaling size cards that can be used to embellish both the fronts and insides of cards.
The adorable 12x12 Element sticker sheet that accompanies this line of papers leaves the card possibilities really diverse-allowing you to go masculine, feminine, young and old with the card themes. 


 Your imagination will spark as it creates layouts with this "Head over Heels" collection. I want to share a non-traditional Valentine themed layout-but the papers seemed to fit the occasion here because my children do love to ride horses. I used a Tim Holtz Alterations Word Play die to help create the title on this layout and a Tim Holtz Alterations Vintage Lace border die to create the small border. 
 I also used the Tim Holtz Alterations Paper Rosette die to create this embellishment:
 I LOVED the "I love you to the moon" title from the Elements sheet and I was able to use it on my second layout celebrating the 60th Anniversary of my in-laws. This layout is a bit more masculine because it uses the arrow and fringed notebook border stickers paired with Tim Holtz Alteratons Mini Gears and Gears set along with Ranger Inkssentials Foil tape sheets (gears).
 I pop dotted a few of the gears to add a bit more dimension to the layout.

 The final Valentine project I would like to share with you is a wooden tray I assembled using a Kaiser product I glued together with Zip Dry and then painted with Art Anthology Sorbe Dimensional Gel Pain in Red Velvet. The gel paint creates a textured glittery surface and dries really fast. 
 I measured the sides of the tray both inside and out and covered with paper from the "Head over Heels" collection. I used my Xyron to place adhesive on papers and make the project come together really fast.
 I cut a few flourishes using the Ranger Inkssentials Foil tape sheets and Tim Holtz Alterations die "Mini Flourish" to place on the handles and around two of the corners. I also wrapped the base with a narrow black ribbon and added a bit of twine and one Maya Road Vintage posie to the handle.
Thanks for checking out my Valentine projects. You can purchase this line of papers, several of the dies and other products I've mentioned her by shopping online or at the store: The Scrapbooking Studio, Moline, IL

Friday, October 11, 2013

{Halloween Cards} with Shelly Maxwell and WRMK

 Create this adorable pop-up card using products purchased from The Scrapbooking Studio. I've used a few Sizzix dies:  Karen Burniston Cards, Square w/ornate edge pop-up 658378 and label insert, the front label was created using Karen Burniston's Frame, Fancy 658038, We R Memory Keepers Halloween papers and embellishments, orange netting tied around the card's crease, and Prima ribbon as a border on the lower portion.
 A pumpkin die and "Trick or Treat" from Sizzix's Tim Holtz collections: Movers and shakers (pumpkin) and Halloween Shadows for the words.
 Prima's silver loosely woven ribbon adds the impression of a spider web to the card's front,


...add bling (above) to the bubbles for added dimension and the fun is just beginning...


I love to use the We R Memory Keepers tags on card fronts-they look great and are easy to use. I taped mine down with yellow polka dot tape.

You can purchase all of these wonderful products (plus a lot more!) at The Scrapbooking Studio.


Monday, September 16, 2013

{Class} Copic Marker Christmas Card Class-October 16, 2013

Join me, Shelly Maxwell, for card class on Wednesday, October 16, 2013 from 6-8pm at The Scrapbooking Studio, 1623 5th Avenue, Moline, IL 61265 
We Will be creating five Christmas cards using the newest line of papers from Bazzill and the newest dies, embossing folders, and more from Sizzix to create two pop-up cards, a dry embossed card, pretty ribbons, flowers, buttons, and  brads. Create five cards using Copic markers to color pre-stamped images. 
 You'll also receive color photos of all the cards, complete instructions, and envelopes for each card.
 Don't have any markers? No worries-you are welcome to borrow mine during class. Copic markers are all 25% off during class-so you can stock up and save big!
Register today by calling Holly at The Scrapbooking Studio: 309-736-7242
Cost $19
October 16, 2013 6-8pm

Thursday, February 7, 2013

Complimentary Sizzix eClips Demo-Saturday, February 16, 2013 12-2pm Moline, IL


EasterTagEclips1_edited-1
Create this adorable Spring/Easter tag-large enough to use as a title block on a layout-or use it as a card-your choice! We will be creating a Distressed tag using a Spritz & Flick method for the background, layered stamping, and Stamp2Cut stamping and die cutting with the eClips machine from Sizzix. Come and see a quick demo to create your very own.
No Fee!
EasterTagEclips3

Friday, January 25, 2013

{Valentine's Cards and More} Now & Then Collection


 Valentine's Day is just around the corner and it's time to get ready! Why not really "Wow" your family and friends with this 3-D card/mini? You can create this card with the Sizzix Album, Accordion Flip 3-D die designed by Karen Burniston for Sizzix.
CardsNowandThen3The double sided papers in the Now & Then Collecton from Teresa Collins is the perfect combination to mix with the die to create Valentine's with a masculine feel.
CardsNowandThen1
I used my scallop and heart shaped punches to add the Valentine touch along with the alpha stickers also available from the Now and Then collection. I tied a little netting into a bow and another bit into a knot to bring out an accent color. CardsNowandThen2
I also created this 6x6 card using the Now & Then Collection, Prima leaf, Maya Road wooden butterfly (colored with Smooch), hand dyed ribbon, Bo Bunny glazed brad, die cut flowers from the Now & Then collection, and adhesive word stickers. CardsNowandThen4CardsNowandThen5
Finally, I would like to share a 5x5 card created with the Now & Then clock paper (love it!), Distress Ink in Brushed Corduroy, die cut pieces, adhesive words and Enamel Dots ALL from the Now & Then Collection designed by Teresa Collins.CardsNowandThen7

Thursday, January 3, 2013

{Card} Pop'N Cuts designed with Teresa Collins papers


StudioSTJan2013PopNCuts1
Teresa Collins' Now & Then line of papers and embellishments was the inspiration for this week's card project. I LOVED her giant die cut flowers from the Now & Then line because they are printed on heavy card stock paper and the matching Enamel Dots work great for flower centers.
StudioSTJan2013PopNCuts6
I also used the Sizzix Pop'N Cuts dies to create this dimensional card. They were so much FUN! You have to try one of these dimensional dies today---The flowers really POP-right out at you. When I coupled the Pop'N Cuts dies (base,  and also Flower, 3-D (Pop-Up)) with the "Hello" set the card almost makes itself. Check out the dimension below:
StudioSTJan2013PopNCuts5
The Teresa Collins' Now & Then papers are nice and heavy and work great with the dies. Here's a picture of the card's inside:
StudioSTJan2013PopNCuts7I used a Spica glitter pen to outline the word "Hello" a bit on the yellow card stock. You can pick up all of these great card making items at The Scrapbooking Studio, Moline, IL 1623 5th Ave, Moline, IL 61265

Friday, July 27, 2012

{Cards} Copics, Dies, Summer Fresh!


What do you get when you combine awesome Sizzix dies, Hero Arts Stamps, Copic markers and Summer Fresh paper from Simple Stories? 
Shelly here, with the answer to that question: you get beautiful cards full of rich colors, dimension, hand colored die cut images and more. Check it out...
This "Happy Day" A2 size card is on a green cardstock base, boasts two pennants (WRMK) and a die cut, pop dotted butterfly from the Butterflies #3 collection of stamps and dies from Sizzix and Hero Arts. Here's the inside:
As you will see throughout this collection the Butterflies #3 stamps and dies have been used to create pretty (and dimensional) flowers and butterflies.
On the card below you will see flowers layered on top of each other (pop dotted), the word "Love" die cut from a mat piece (also die cut) using Tim Holtz Alterations from Sizzix "Ornamental" die and "Love" movers and shapers die.
The 6x6 paper pad from Simple Stories containing the Summer Fresh line of papers and tiny/small die cut journaling pieces and titles works great on cards. (Inside below):
A flip card...
...allows the butterfly to peak through and be seen from the front and the "inside" of the card when it is "flipped".
This card was die cut from a Sizzix Flip-Card die. It is about 5"x5" so it will require a larger envelope than an A2 size card will use.
And one final A2 size card, again featuring die cut stamped images colored with Copic markers to create vibrate, beautiful die cut images. (Use dimensional pop dots to give your die cut shapes a bit of a "wow" factor!)
 And the inside:
I hope you enjoyed taking a look at some fun summer cards you can create using dies, papers, and markers all purchased at The Scrapbooking Studio, Moline, IL.