Showing posts with label Distress Ink. Show all posts

Saturday, November 1, 2014

Christmas Distress Art Parts Class-Wednesday, Nov. 19, 2014 6-8PM

Baby it's cold outside! so join me, Shelly Maxwell, INSIDE on 
Wednesday, Nov. 19, 2014 from 6-8 PM
for a Christmas Distress Art Parts Class
Cost/$25 per kit
We will be creating the two projects shown above. Distress Inks, Blending Tools, Stickles, wire, Crop-a-Diles, gems, paint, glitter, you name it-we'll b using a lot of it during class. 
 This home decor plaque would be great to add to your Holiday collection.
The second wall hanging project would be great to give as a gift for the holidays (or keep it for yourself).
Here's what you'll need for class:  heat tool, blending tool (small round works best with templates), 4-5 sponge tops for your blending tool, a container to carry projects home in after class (shoe box size), Tim Holtz scissors (red handled)., your favorite liquid adhesive, large glue dots.

Call to make your reservations today! 
(Space is limited for this class)
 1623 5th Avenue
 Moline, IL 61265
 309-736-7242

Monday, September 8, 2014

Graphic 45 An Eerie Tale Collection} Configurations Print Tray

I've had this Tim Holtz Idea-ology Configurations Tray for a while-waiting for the perfect paper line-the perfect line that was Configurations Tray worthy: Graphic 45 An Eerie Tale Collection hit the mark.
Each box captured my imagination and I love the individual stories each box gets to tell: what's in that bottle? Don't you want to find out?
 There is something alluring about the "dark" side of life-
 A Graphic 45 shabby chic ornate metal key is the perfect embellishment for the candy house, right?
 What's inside that secret pocket?
 I love to show off my collections of pictures and bones?
 The Configuration Tray's boxes offer lots of opportunity for dimensional layering like this corrugated trading card piece inked with Distress ink and embellished with a Maya Road flower which has been colored with Distress markers. The stamp is a sticker : 
 Use tissue tape to hold it all together. I used a green with dots tape around the outside and a black with vine over the edges to add a finished look and secure the boxes in place.
Each box was colored with Distress inks mixed with water, painted on and then dried.
An Eerie tale papers were cut to fit in each box, layered with additional papers, stickers, die cut flowers, or pockets.
This Halloween project was fun to create because it gave me a chance to use a lot of the lumpy dimensional embellishments I love that are too bulky to use on a layout or card.
 Each box was inspired by the paper line and it's embellishments. 
Grab all these Halloween goodies at The Scrapbooking Studio, Moline, IL

Friday, August 15, 2014

Graphic 45 Botanical Tea Mini-Album

Graphic 45 Botanical Tea Collection contains numerous double sided papers, cardstock stickers, journaling pieces, and more. Check out a mini-album project using the papers and some additional embellishments:

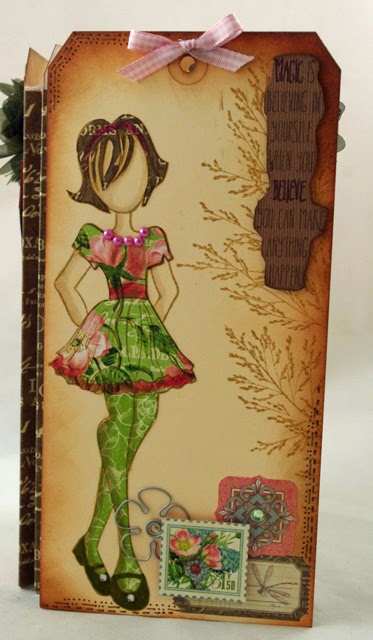
I created a tag mini-album using this beautiful Botanical Tea collection. It pairs great in this mini with Wendy Vecchi's stamps. I used stamps from Wendy Vecchi's Original Art set and from her Framed Art set of stamps throughout the book. The young girl on the cover was created with a Prima Mixed Media stamp. The tags measure 8 1/2" x 4 1/4" each.
I used Distress Ink along the edges along and detailed  pen work to create a border. The girl stamp was stamped onto several of the papers from the Graphic 45 collection, then I fussy cut them using pointy scissors, and the pieces were adhered to the stamped image on the cover tag. I used a Spica Glitter pen to color her belt, ruffles, and headband. I used Distress Markers to add shadows to the image.

 The lower right cluster contains stickers from the collection along with a Maya Road wire flower.
 
I added a green velvet ribbon border to the top of the right pages along with a Maya Road ribbon flower and a Maya Road bingo piece for the flowers's centers to add a line of consistency throughout the mini-album.

Journaling pieces are added throughout to help tell the story of my daughter at horse shows over the past summer (2014). 
 Since my daughter is 15 this summer, I made sure one of my bingo pieces was a 15.
 Advantus Tim Holtz Idea-ology Industrious stickers make great borders along the edge of pictures.
 I bound the book together with a piece of accordion folded paper (1/2" folds) adhered to the edges of the tags. 
Thanks for taking a look my mini-album project created with Graphic 45's Botanical Tea collection.  The Botanical Tea Collection is available at The Scrapooking Studio, Moline IL or you can order it onnline: www.thescrapbookingstudio.com  along with a lot of other great products that are also available online.

Thursday, February 7, 2013

Complimentary Sizzix eClips Demo-Saturday, February 16, 2013 12-2pm Moline, IL


EasterTagEclips1_edited-1
Create this adorable Spring/Easter tag-large enough to use as a title block on a layout-or use it as a card-your choice! We will be creating a Distressed tag using a Spritz & Flick method for the background, layered stamping, and Stamp2Cut stamping and die cutting with the eClips machine from Sizzix. Come and see a quick demo to create your very own.
No Fee!
EasterTagEclips3

Thursday, January 31, 2013

{Layout} Authentique's "Renew" collection


Authentique's "Renew" collection was the inspiration for this 12x12 layout complete with bling, ribbons, die cuts, and lots more! I grabbed a pack of Authentique's complete collection along with a sheet of the Titles & Phrases to complete this look:
FebLayout (7)_edited-1
I love the sayings that re part of the 12x12 sticker sheet included in the collection:FebLayout (6)
I added tiny bling at each corner (above) and for the butterfly's body (below).
FebLayout (4)
Layered circle die cuts make great embellishments (above).
FebLayout (3)
Pleated ribbon layered between circle accents helps draw the eye across the page.
FebLayout (1)
I used Distress Inked die cut mats, stickled scolling border (top), and a stickled flower (center).
There are several papers in this collection that are subtle and sophisticated-perfect for any type of photos you need to get scrapped. All of these pieces are available at The Scrapbooking Studio, Moline, IL.

Friday, July 13, 2012

{Step-by-Step} Creating Custom Mists


{Step-by-Step} Creating Mists Using the newest Ranger Distress Inks:Squeezed Lemonade, Peacock Feathers, Shaded Lilac! 

By, Shelly Maxwell

Posted Image
Step 1: Collect your supplies. You'll need some of the Ranger Inks, Ranger Mini-Misters, and Ranger Perfect Pearls (I used blush and Kiwi). Use a fine point Sharpie Marker to label each of your Misters with the Ink's name. You'll also need some coffee filters, white ribbon, felt, etc. to ink and a heat tool.
Posted Image
Step 2: Open your first Mister, add one dropper full of ink into the Mister.
Posted Image
Step 3: Carefully open one of the Perfect Pearls containers and use a small scoop or tiny spoon to place a smidgen of the Perfect Pearls into the Mister with the ink.
Posted Image
Step 4: Add enough tap water to about 1/4" down from the top of the Mister. Place the cap on the Mister and shake vigorously to mix the ink, pearls, and water.
Step 5: Use coffee filters and a die to cut several different sized flowers. (Ranger's Tattered Florals works great for this).
Posted Image
Step 6: Lay about 1/3 of the die cut flowers onto a covered surface and spray with one of the mists you just created. Use a paper towel to sop up excess overs pray, then dry the flowers using a heat tool. Next, lay down the second 1/3 of die cut flowers, spray with the second color, and so on until all flowers have been sprayed, colored, and dried.

Create beautiful flowers, ribbons, more! Use your new creations on home decor items (like the wreath pictured here), layouts and cards. Have fun creating!!
Posted Image
I used a 12x12 brown paper bag cut into 2" strips, sprayed with ink, dried, and then wrapped around the wreath. I used sticky dots to adhere the coffee filter and Prima inked flowers, inked silk bow, and punched "Welcome" sign.
Posted Image


Supplies:
Inks: Ranger Squeezed Lemonade, Peacock Feathers, Shaded Lilac
Supplies: Misters, Perfect Pearls, Styrofoam Wreath, Brown paper bags (with print), silk ribbon
Bling: Teresa Collins crystal and brads 
Posted Image
My Blog: paperartbyshelly

Tuesday, April 3, 2012

{Tip & Technique} Creating Masculine Layouts


Posted Image
It can be a challenge finding supplies to create masculine layouts for men and young men. I am on constant high alert for masculine embellishments & techniques! Today I would like to share a few of the ideas I've picked up along the way. For example, I look at current clothing styles (particularly boy's t-shirts) to see what shapes appear over and over or what themes seem to be popular-a lot of times the shapes I see are geometric like circles, lines, and stars. Another way to add masculinity to a layout is with texture: try using Sizzix embossing folders on Core' dinations kraft core paper and then sanding the paper to give it a distressed look (there is some in the layout below tucked behind the photos and the stars too). Anything metal adds to the masculinity as well-like silver brads (I've put a few in the centers of the stars), buckles, silver paint. Also, wooden embellishments like Maya Road bingo markers are a great way to make it manly (I've used a Maya Road star bingo marker to visually anchor the horizontal fabric strip). I've used a variety of these masculine techniques along with Studio Calico's Elementary Collection which is PERFECT for creating the more masculine layouts. The vertical lines, journaling cards, and fabric strips add the perfect amount of masculinity to the layout.
I've also added some distress ink around the edges of some of the paper & fabric strips to "dirty" it up a bit. Here's how I use my Ranger blending tool to add distress ink to paper, fabric, and embellishments:
Begin by putting a foam pad onto the blending tool handle and then dabbing it onto a Ranger Distress Ink pad.
Next, place the inked blending pad/tool onto your protected work surface right next to the edge of the paper, picture, embellishment or fabric you are going to distress.
Make very small counter-clockwise circles with the blending tool bringing the inked foam pad onto the edge of the item to be distressed. Remember to keep moving the blending tool as you work your way around the outer edge of the item.
You can begin to see the brown edge I am creating as I work around the picture, blending in a counter-clockwise motion. (This prevents creating visible lines of ink on the object).
Make sure you practice on a scrap first before using your original picture or papers so that you can master this technique!
 Posted Image
Posted Image
Studio Calico paper, fabric, journaling cards

Thursday, March 15, 2012

{Card Challenge} Monochromatic Color Challenge


Posted Image

First, a few Fun Facts from Lisa, store owner of AWDML: We now own a 3,300 square foot building in downtown Rock Valley, Iowa. We have a 23x26 classroom/workshop area that will fit 16 ladies for a crop or class.
Old Store
Attached Image: OldStoreForWeb.jpg
New store
Attached Image: NewStore3FORWEB.jpg
I still do the majority of the work for AWDML. I have 2 ladies that come in and help at the B&M store, but I purchase, check in, update the online store, and do the accounting for AWDML. Lacinda comes in about 2 days a week for me and she packs online orders, merchandises the inventory, arranges the store, and is my right hand lady. Samantha works a few days a month to give me a Saturday off, and she also teaches some classes one Saturday per month. My mom also comes in when we need her, and she helps price items for clearance, cuts our felt for Stamp School, and organizes the back room.
And now a Card Challenge from Shelly:  Create a monochromatic card using different texture to add interest to the card's design. I've included felt, funky ribbon from Little Black Dress, canvas flowers, pins, floss & dry embossing with Distress Ink to add dimension and interest to my monochromatic card. It's your turn next! Create a monochromatic card and post it to the AWDML blog using Mr.Linky. You have until March 30, 2012 to post your creation.

Shelly's Color Card Challenge:  Create a monochromatic card using different texture to add interest to your design. I've included felt, funky ribbon from Little Black Dress, canvas flowers, pins, floss & dry embossing with Distress Ink to add dimension and interest to my monochromatic card. It's your turn next! Create a monochromatic card and post it to the AWDML blog using Mr.Linky:

Supply List:
Ink: Festive Berries Distress Ink from Ranger (ON SALE: Tim Holtz Winter Distress Ink pads. Normally $17.99 on sale for $13.99)
Guidelines:
All challenges will be posted from March 5th to March 8th. You will have till March 30th to link your creations in the Mr.linky box. For every challenge that you do, your name will be put in a random drawing. The winner will recieve $15 GC to the store.
How I did it: First I cut a 4"x5.5" size card from white cards stock and embossed the card front using a Sizzix embossing folder. Secondly, I colored the embossed images with the Distress Ink: Festive Berries using a Tim Holtz blending tool. Third, I die cut a felt border and inked the felt with the Festive Berries Distress Ink. Fourth, I die cut a flower and layered it's concentric pieces including a Jillibean Soup Canvas flower. Before adhering the flower using a pop dot, I curled the Little Black Dress ribbon using scissors and split the fibers and then inked the fibers using Distress Ink: Festive Berries and adhered the ribbon behind the flower. Sixth, I wrapped the pins with floss and adhered them to the center of the flower using glue dots. Seventh, I adhered the Jillibean Soup "Smile" sticker to top center of felt and used a hole punch to place holes on either end of the sticker. I placed silver brads through holes. Lastly I used a Martha Stewart border punch along bottom of card and saved the "waste" strip and placed that along the very bottom of the card.