Showing posts with label Valentines. Show all posts

Tuesday, January 27, 2015

Simple Stories Design Team Hugs and Kisses and Snow Fun Layout and Cards

 Simple Stories' Valentine line of papers, Hugs and Kisses ,is a cheery light hearted paper collection  because of it's bright color palette. It is fun to create Valentine's Day Treats inspirational products:
Above is an SRM pillow box container wrapped in a paper border, embellished with stickers, and sprayed with silver colored Glitter Dust spray. It's filled with chocolates! Below is a Pebbles  treat bag filled with chocolates. I added a bicycle sticker from the sticker sheet, folded over the bag's top and secured it with a red Doodlebug clothespin.
 I used a tag shaped punch to create tags from the Love Letters paper. (They are about 2x3" un-punched).
Above and below tent shaped treat containers were created using 2" wide strips of various pieces of Hugs and Kisses paper, folding them to create two sides and the bottom, filling cellophane bags with treats and putting them inside the paper tents.
 I secured the cellophane bags with my Tim Holtz Tiny Attacher, and the covered the staples with embellishments
 The 6x6 "LOVE" card was easy to create with the sticker sheet, ribbon, and a
  beautiful Graphic 45 key tied with twine. I secured the ribbon and key with glue lines and glue dots.
 I would also like to share this winter themed layout using Simple Stories Snow Fun paper collection:
 I used their fundamentals 6x12 sticker sheet to add some words and circles to the page, and clear crystals for the snowflake centers. I used a Copic Marker to color some of the crystals a lime green color so they would match the paper.
 Finally, here are a few cards also created with the Snow Fun collection. I love the Snowman icons found throughout this line of papers and stickers:
 I used an SRM silver doily as a mat for my greeting which is pop dotted onto the doily. I die cut the racoon using a Sizzix die, and the large snowflake is also cut using s Sizzix die.
Fawn lawn white dots hold the banner together, a snowflake charm held on with fine floss adds a bit of texture to the card. I also used a Chalksters white marker around the edges of the blue paper.
 The circle mat was created with a WRMK 6x6 punch, the window, snowman, cocoa, and ticket are all stickers from the 6x12 fundamentals stickers. I added some silver/white glitter paper for a little sparkle.
Thanks for taking a peak at these Valentine treats and winter layouts and cards. Remember, you can find them all at The Scrapbooking Studio, Moline, IL

Sunday, December 28, 2014

Rescheduled!: Valentine Copic Card Class Jan. 7, 2015 6-8PM changed to 1/14/15

Due to extreme low temperatures today 1/7/15 this class is being rescheduled to 1/14/15!
Registration is now OPEN for the Valentine Copic Card Class
 January 7, 2015 6-8PM
The Scrapbooking Studio located in Moline, IL
Register by calling (309) 736-7242
Register online at www.thescrapbookingstudio.com
We will be creating five Valentine cards using Basic Grey printed papers and brads, Copic Markers, Doodlebug Heart Jewels, Twinery Red Shimmer Baker's Twine, and tons more! 
 We will be creating a heart flip card (above) and a circle cut-out card (below). I will be teaching three Colorless Blender Techniques during class.
 NEW THIS YEAR: You will need to supply you own Copic Markers for class. Please bring the following markers with you to class: E00, E17, E18, E19, E21, E23, R24, R27, RV32, RV34 and the Colorless Blender. We will also be using the following Spica glitter pens: Red, Orange, Silver, Clear.

Also, please bring a glue pen, large and small pop dots, large and small glue dots, pointy scissors for cutting. 
Each class kit includes color photographs of the cards along with detailed instructions for completing on your own if desired.
 Please call and reserve your seat for class or your kit to go by calling The Scapbooking Studio at 309-736-7242. Cost for this class is $20/kit.

Tuesday, January 14, 2014

Valentine Projects with Echo Park's "Head Over Heels" Collection by Shelly Maxwell

 You will be able to create to your heart's content with this versatile line of double sided papers. The collection is HUGE and offers great inspiration including journaling size cards that can be used to embellish both the fronts and insides of cards.
The adorable 12x12 Element sticker sheet that accompanies this line of papers leaves the card possibilities really diverse-allowing you to go masculine, feminine, young and old with the card themes. 


 Your imagination will spark as it creates layouts with this "Head over Heels" collection. I want to share a non-traditional Valentine themed layout-but the papers seemed to fit the occasion here because my children do love to ride horses. I used a Tim Holtz Alterations Word Play die to help create the title on this layout and a Tim Holtz Alterations Vintage Lace border die to create the small border. 
 I also used the Tim Holtz Alterations Paper Rosette die to create this embellishment:
 I LOVED the "I love you to the moon" title from the Elements sheet and I was able to use it on my second layout celebrating the 60th Anniversary of my in-laws. This layout is a bit more masculine because it uses the arrow and fringed notebook border stickers paired with Tim Holtz Alteratons Mini Gears and Gears set along with Ranger Inkssentials Foil tape sheets (gears).
 I pop dotted a few of the gears to add a bit more dimension to the layout.

 The final Valentine project I would like to share with you is a wooden tray I assembled using a Kaiser product I glued together with Zip Dry and then painted with Art Anthology Sorbe Dimensional Gel Pain in Red Velvet. The gel paint creates a textured glittery surface and dries really fast. 
 I measured the sides of the tray both inside and out and covered with paper from the "Head over Heels" collection. I used my Xyron to place adhesive on papers and make the project come together really fast.
 I cut a few flourishes using the Ranger Inkssentials Foil tape sheets and Tim Holtz Alterations die "Mini Flourish" to place on the handles and around two of the corners. I also wrapped the base with a narrow black ribbon and added a bit of twine and one Maya Road Vintage posie to the handle.
Thanks for checking out my Valentine projects. You can purchase this line of papers, several of the dies and other products I've mentioned her by shopping online or at the store: The Scrapbooking Studio, Moline, IL

Saturday, January 5, 2013

{New} January Sweet Tooth Card & Mini Kits


Happy Valentine's Day! It's time to start creating your handmade Valentine's and Sweet Tooth would love to make the job a little bit quicker and A WHOLE LOT easier!! We're offering a five card kit to help you with your Valentine's this year. Authentique's  line of Valentine papers were used to in this collection along with lots of frilly ribbon, bows, glittery hearts and more! Each kit includes photo instructions, envelopes, and pre-stamped and die cut pieces. $11/five card kit. Item #201301-165

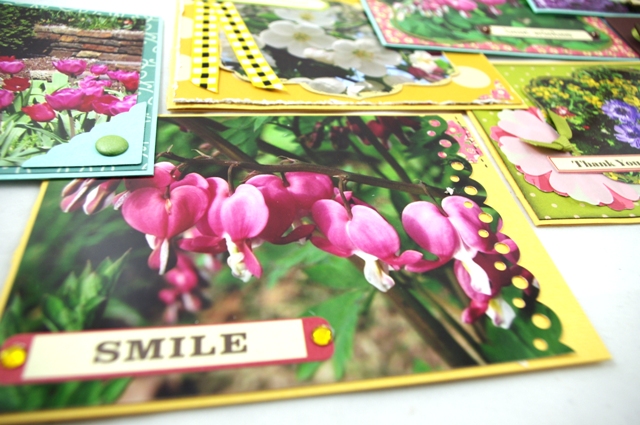
The second card offering this month is something TOTALLY NEW for Sweet Tooth: floral photos were the inspiration for this seven card ALL Occasion collection. Photos were taken by friend and co-worker Jennifer McDonald. Jennifer's nature photos have been featured in several calendars celebrating the beauty of Hickory Hill Park, Iowa City, IA. She's allowed me to use several photos of flowers taken throughout the U.S.:
I've added my style and some Soup Labels from Jillibean Soup 
The bling, ribbon and techniques make these cards as unique as the flowers themselves!
Each kit includes color photo instructions, envelopes and all die cut, painted and pre-cut pieces. $15/seven card collection. Item #201301-167

Outdoor Adventure Mini-Album is a third offering this month at Sweet Tooth Scrapbooking. Get all of those summer camp photos, camping trip expeditions, and ghost stories recorded now! It couldn't be any easier to create with this twelve page 4x6" mini featuring Bo-Bunny's papers, glassine envelopes, Thicker chipboard alpha stickers, buttons, twine, and tons more!


Each of these mini-album kits is being offered for $19/kit. Item #201301-169.

Sunday, December 9, 2012

{Copic Card Class} Valentines!


January Copic Card Class

Create five Valentine themed cards using papers from the newest BoBunny Collection: Love Letters along with their matching brads and cardstock stickers.

Each card will be adorned in ribbons, bobbles, flowers and lots more. We will be using Copic Markers to color stamped Valentine images from Stampers Anonymous Tim Holtz Valentine Collection stamps perfect for friends, spouses, and children.

We will be using the following markers during class: BG10, BG11, BG13, BG15, BG32, BG34, R11, R12, R20, R21, R22, R35, R39, W1, W3, W5, E00, E11, Y32, Y35.


You may borrow my markers during class if you do not own your own. Each class kit includes color photos, written instructions, and envelopes.


Register by calling the Moline store at: (309) 736-7242. (The last Copic Card class sold out-so be sure to register with payment as soon as possible if you want to guarantee your seat in class).


Cost $19/kit
Date: January 13, 2013
Time: 6pm-8pm
Teacher/Designer: Shelly Maxwell

Sunday, January 8, 2012

Got a Valentine on your mind? Why not make them a beautiful handmade card?

Stock up on Valentine papers & embellishments at The Scrapbooking Studio, Moline, IL Amy has everything you need to create adorable Valentine's this year! Stop by the store this week to pick up Valentine patterned papers like Pebbles, MME, Reminisce, and others, STAMPS, Valentine Embellishments (like the twist ties I used on the card below), heart shaped buttons, gorgeous ribbons, and lots more. Read on for great inspiration, a quickie step-by-step card, and peeks at pop up card insides created with Sizzix dies. I {heart} my Vagabond!! I used it to create all of the die cut images in this post.
Create this card using Pebbles papers, twist ties, and heart shaped  self-adhesive buttons, Copic markers, stamped images, border punches, and Accucut die used to create card. Heart and scalloped punches from McGill.

Create this card using Pebbles papers & twist ties, Sizzix Hearts-a-Plenty, 3-D (Pop-Up),  Sizzix  Flowers, 3-D #2, corner punches, stampes, ribbons & small white bag, Sizzix embossing folders. Watch my blog on Jan. 12, 2012 to get instructions on how to create your own coffee filter flower like the one above. 

Create this adorable pop-up heart using the Sizzix Hearts-a-Plenty, 3-D (Pop-Up) die available NOW at  The Scrapbooking Studio

Step-by-Step Quickie: Die cut a large flower (or trace a large flower & fussy cut) and adhered it to the top flap of the tri-fold A2 size card (use a 12x12 strip of paper to do this). Second, cut a mat for the front of the card and adhere it to the card front. The tri-fold flap should come down over the mat/card front. Third, I used the 1/4" border strip from the bottom of the 12x12 Pebbles paper to create the belly band that holds the flap in place. Finally, I punched a scalloped heart (that I stamped & colored) and attached it along with several smaller punched hearts to the band. Ta-da! Adroable Valentine that will impress your friends. Don't forget to add your Pebbles heart-shaped self adhesive buttons for increased drama & WOW factor!

This 6x6 Valentine was created using Accucut dies, heart shaped punches and the Sizzix Hearts-a-Plenty, 3-D (Pop  Up) die, stamps, ribbons,Tim Holtz label die with "Love" cut from center.

Adorable nostalgic Valentine greeting stamped with Iced Spruce Distress Ink and Colored with Copic Markers & atyou Spica Glitter pens.

Front of Card Close-Up: notice the dimension the twist ties add (they are wired and bendable-super cool ), the gorgeous white roses, and layered hearts just ooze LOVE.
Thanks for taking a look at great new papers, dies, embellishments, ribbons, and LOTS more available at The Scrapbooking Studio.