Showing posts with label layouts. Show all posts

Tuesday, December 1, 2015

Reminisce Design Team: Wizard 101

Do you know the feeling you get when you find the perfect paper for your vacation photos?

Wizard 101 from Reminisce is the perfect collection for your most recent Florida vacation to theWizarding World of Harry Potter.

 Whether you're a fan of the original "Hogsmeade" park or the newer "Diagon Alley" park at Universal Studios in Orlando, FL you'll want to grab the entire Reminisce Wizard 101 Collection. This on trend collection embodies all of the iconic Hogwart House plaids plus many more familiar images to make scrapbooking your vacation quick, easy, and impressive.
 This 12x12 layout makes use of the 12x12 sticker sheet from the Wizard 101 collection for both the main title and subtitles (above) and also to label all  the Diagon Alley photos (below).

Be sure to check out all of the newest offerings from Reminisce at your local scrapbooking or paper crafting store.

Tuesday, January 27, 2015

Simple Stories Design Team Hugs and Kisses and Snow Fun Layout and Cards

 Simple Stories' Valentine line of papers, Hugs and Kisses ,is a cheery light hearted paper collection  because of it's bright color palette. It is fun to create Valentine's Day Treats inspirational products:
Above is an SRM pillow box container wrapped in a paper border, embellished with stickers, and sprayed with 
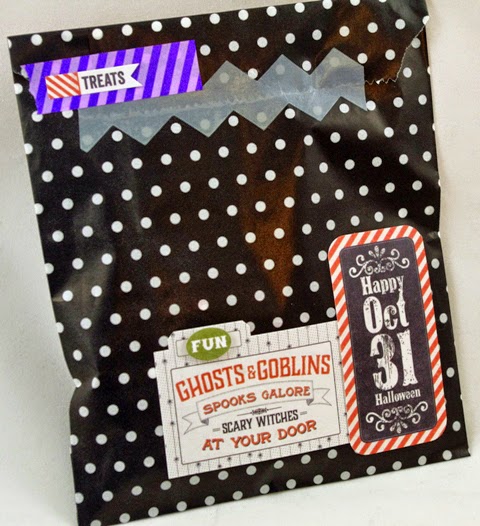
silver colored Glitter Dust spray. It's filled with chocolates! Below is a Pebbles  treat bag filled with chocolates. I added a bicycle sticker from the sticker sheet, folded over the bag's top and secured it with a red Doodlebug clothespin.
 I used a tag shaped punch to create tags from the Love Letters paper. (They are about 2x3" un-punched).
Above and below tent shaped treat containers were created using 2" wide strips of various pieces of Hugs and Kisses paper, folding them to create two sides and the bottom, filling cellophane bags with treats and putting them inside the paper tents.
 I secured the cellophane bags with my Tim Holtz Tiny Attacher, and the covered the staples with embellishments
 The 6x6 "LOVE" card was easy to create with the sticker sheet, ribbon, and a
  beautiful Graphic 45 key tied with twine. I secured the ribbon and key with glue lines and glue dots.
 I would also like to share this winter themed layout using Simple Stories Snow Fun paper collection:
 I used their fundamentals 6x12 sticker sheet to add some words and circles to the page, and clear crystals for the snowflake centers. I used a Copic Marker to color some of the crystals a lime green color so they would match the paper.
 Finally, here are a few cards also created with the Snow Fun collection. I love the Snowman icons found throughout this line of papers and stickers:
 I used an SRM silver doily as a mat for my greeting which is pop dotted onto the doily. I die cut the racoon using a Sizzix die, and the large snowflake is also cut using s Sizzix die.
Fawn lawn white dots hold the banner together, a snowflake charm held on with fine floss adds a bit of texture to the card. I also used a Chalksters white marker around the edges of the blue paper.
 The circle mat was created with a WRMK 6x6 punch, the window, snowman, cocoa, and ticket are all stickers from the 6x12 fundamentals stickers. I added some silver/white glitter paper for a little sparkle.
Thanks for taking a peak at these Valentine treats and winter layouts and cards. Remember, you can find them all at The Scrapbooking Studio, Moline, IL

Tuesday, November 4, 2014

"The Story of Us" Simple Stories Design Team Projects

This wonderful line of papers and embellishments from Simple Stories is, perhaps, one of my all-time favorite Wedding/Anniversary lines ever published. The muted colors work great with any color scheme, double sided papers offer endless options from woodgrain (see below) to stripes, arrows, dots, butterflies, and of course hearts.
 The embellishment collection includes a 48 piece cardstock die cut ephemera bits and pieces pack (used throughout the samples) and a collection of 28 Decorative Metal Brads and Tags (see flower's center and several other locations throughout these samples).
 I had fun layering several bits and pieces here along with a few brads:
 I appreciate the inclusion of this 4x6 card found on the 4x6 Horizontal Journaling Card Elements paper which lends itself to the perfect anniversary card.
 Doilies layered with hearts, and birds create this cover embellishment on a mini-album I created using "The Story of Us" Simple Stories paper line along with photos from my nephew's September 2014 wedding (Congrats Tim and Melissa!).
 The tabbed chipboard pages have tiny stickers from the 12x12 sticker sheet, I used  Charcoal Cat Eye Inks around some of the edges after I sanded them with the Tim Holtz sanding tool:
 Two hinged rings hold it all together:
Thanks for taking a peak at this week's Scrapbooking Studio Design Team pictures! Be sure to stop by The Scrapbooking Studio, 1623 5th Avenue, Moline IL 61265 to take a closer look at these and lots more projects and to check out their awesome sales. 

Thursday, October 30, 2014

Authentique Spirited Collection with Shelly Maxwell

Halloween is all about the treats, right? 

Why not make them fancy with treat bags? 
Seal them up with tissue tape and a Halloween sticker greeting!
 Halloween Treat Bags
 Authentique's Spirited Line of papers is a solemn tribute to
 Halloween and all things creepy:


 Cut borders from "Labyrinth" (a two-sided cardstock weight paper) and layer, then pop dot for dimensional impact. Don't forget a spooky skeleton sticker and an enamel dot.
  These papers add maturity to the Halloween Holiday making them perfect for your teenage goblins (I have two-so I'll be stocking up!) 
Suspicious

 I loved using the orange hinge stickers to create a flap on the front of this A2 card. Plenty of stickers allow for inside decorations too!

This 6x6 chipboard mini-album came right together with spray adhesive, my crop-a-dile for punching holes and two green jump rings. I added a fluffy die cut paper flower and white tulle to the front of the card for dimension.


Grab these Halloween treats at The Scrapbooking Studio, 1623 5th Avenue, Moline IL or purchase them online at: www.thescrapbookingstudio.com. 309-736-7242

Monday, June 23, 2014

Market Street Layout, Cards and Banner

Summer has finally arrived and the Market Street papers, die cuts, foil papers, chipboard pieces, and buttons from My Mind's Eye are a great way to capture your warm sunny memories in the trendiest style. You can grab your entire summer stash at The Scrapbooking Studio in Moline, IL. This layout created with pictures from a 2010 Wisconsin trip came together elegantly and with all the current style thanks to MME's "Mixed Bag"-a 46 piece collection of die cuts, words, journaling spots, and really unique foil accents. In addition to the cursive words from the Mixed bag, I also used American Craft Thickers to create the title. (Emma in Gold). 
 Gold vellum paper is used as a photo mat coupled with a gold foil doily and...
 heart sticker taken from the Nob Hill Label Stickers sheet.
 Chipboard pennant pieces create a tiny banner just below the title. Die cut flowers-popped with dimensional foam stickers give the layout a little bit of depth paired with a foil leaf and foil swirl to add balance to the right side of the layout. The floral background piece (1/2 on each page) was cut down to 11x11, corner punched with the weR Mini 8 Punch (Flourish), and cut in half to create the two background mats.
 The MME Market Street Nob Hill label stickers (70 pieces) offer great inspiration for cards:
 Check out the hippest mustache motif that runs through this entire line...
A moose with a mustache?
A wooden light bulb embellishment (Maya Road) colored with Distress Markers are the focal point of a foil, vellum and paper layered flower in the upper left corner of this card. It is perched on top of a wooden "Hello" frame from Freckled Fawn.
 This card base is a gorgeous black with gold polka dots that is very glamorous! I've folded back a corner of the mat and tucked a Maya Road pin (colored with Copic markers to match the paper line), wooden spool with paper wrapped around it, and tool for a dimensional accent. The bow, foil leaf, foil medallion, and music are all taken from the Mixed Bag that is part of the MME Market Street Collection. The doily is actually a piece of die cut Real Wood Thin Birch from Creative Imaginations colored to match with Copic markers.
 And the last card I wanted to share with you also features a bit of the Real Wood Thin Birch from Creative Imaginations-but his time I embossed it with an embossing folder. The "Thank You" is a sticker from the Nob Hill Sticker sheet.
 The Banner below features several pieces of the double sided papers from the Market Street Collection from MME, as well as their button (pins), chipboard buttons, Maya Road tiny clothespins, wooden light bulbs, Petaloo Flowers, doily die cut Real Wood Thin Birch from Creative Imaginations and colored with Distress Ink/blending tool, and lots more.
 The Maya Road wooden light bulbs take the Distress stains very well! The "learn" sticker stayed on even after the piece was stained.
 I love this button (and so did my kids) that is attached to the wooden doily I mentioned earlier in the post.
Thanks for spending a bit of your day checking out all that the MME Market Street Collection has to offer. You can pick all of this up at The Scrapbooking Studio, Moline, IL.