Tuesday, July 31, 2012

{Copic} Tips & Techniqus


Posted Image
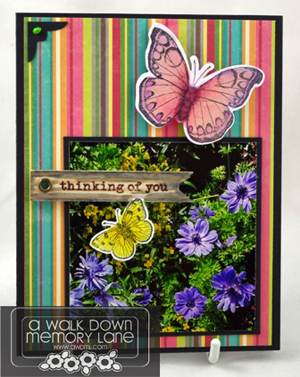
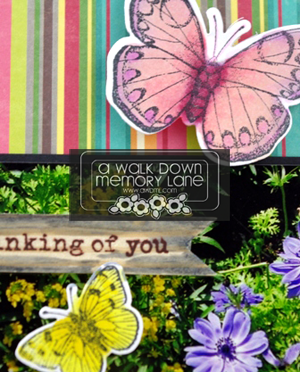
I was anxious to use Copic markers until about a year ago when I took the time to really sit down and practice, practice, practice. (I still practice). I would like to share one of the basic coloring techniques to use with Copic markers. I created a summery card using bright reds, some muted greens and a bit of yellow for the flower's centers (along with a pearl). Here's my card using the basic coloring technque:
Basic Color Technique:
Before you begin, start with a clean work surface, scratch paper beneath your stamped image, and good lighting. Also, gather your markers, X-Press It paper, and stamped images.
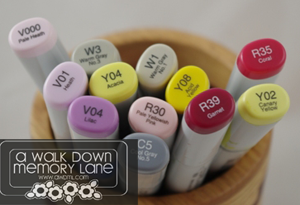
I used the Copic markers pictured above plus the new Stamp & Die Set Butterfly #3 from Sizzex Hero Arts to stamp my flower's image, Tuxedo Black ink from Tsukineko, and X-Press It paper.
I began with R24 and using the brush tip color in a circular motion I kept the edge of the color wet so as not to leave any lines!
This stamp set is so awesome because the shaded areas are part of the stamped image! (It's a lot easier than trying to figure out where the shadows should go by myself).  Next, I choose R27 to color the shaded areas using a flicking motion with the brush tip. I was sure to LIFT the tip as I drew the marker from the darkest area to the lightest area.
Once I had colored the areas I wanted to add shading to; I colored over the entire image AGAIN with R24 to blend the two colors together.
Now, to really add some dimension, I used a third color R29 to the darkest shadowed areas using the "flick and lift" method.  For a third time, I AGAIN went back and colored with R24 to blend out any lines.
Here are some additional Tips:
a)Remember to think of the colors as layers, one on top of another.
b)Use the Colorless blender to PUSH any color that may have gone outside the lines of the stamped image. 
c)Practice
Keep stamping and coloring the same image over and over until you get it to look the way you like it. (I colored this image twice before I had one I liked).
d) It is important to use the right paper and ink or your results will not be what you are expecting!
e)Use inks like Ranger Distress Ink or Tsukineko Ink. Not doing so will cause your image to smear and run.
e) Also, the paper really is important too. Try using X-Press It blending paper to get really clean crisp images.

Posted Image


 Supplies
Markers: Copics

Friday, July 27, 2012

{Card Sketch} with Copics


{Card Sketch} with Copics
by Shelly Maxwell

I would like to share a fun sketch with you today that can easily incorporate Copic colored stamped images. Here's the sketch:

Posted Image

Here's my take on it:

Posted Image

I used these Copic Markers to color in the stamped and die cut butterfly images and the Jillibean Soup wooden "Thinking of You" greeting:
Posted Image

Here's a closer look at the two butterflies:
Posted Image


As you can see, this sketch really lends itself to the use of almost any shape in the two circle areas. I used the new Sizzix Hero Arts Butterflies #3 die and stamp set. They are so easy to use with the Copic markers because the areas to added shading to are obvious once the image is stamped and to really give the card a summery feel I also added an actual photo to my card front.

Supplies:
Dies/Stamps: Sizzix Hero Arts Butterfly #3
Paper: Copic X-Press ItAmerican Crafts CardstockJillibean Soup Watermelon Gazpacho 6x6 Pad
Markers: Copics
Embellishment: Jillibean Soup
 
Posted Image

The Lawn Ranger...


Copic Markers are alcohol-based markers that become acid free as soon as the alcohol dries. The thing that makes them different from water based markers is that they don't tear up the surface of the paper as you layer one color on top of another. This does happen with water based markers. Layering the colors is what will give your stamped image those awesome shaded areas!
Copic markers are available is several different types (Sketch, Copic, and Ciao among others). The difference between these types is the number of colors they are available in (The Sketch Marker is available in 358 colors, the Copic Marker comes in  214 colors, and the Ciao is available in 180 colors), their airbrush compatibility, nib types that you can use in them, and ink capacity in the barrel of the marker.
The Ciao Markers hold the least amount of ink and therefore are usually a little less expensive then the others. The Copic has the most nib choices. All markers are refilled with the same type of ink. Refills are available so NEVER through away your Copic Makers!!!
All Copic markers are labeled with embedded information so it will never rub off!
I used my Copic markers to create this 6x6 Lawn Ranger card. He's pretty funny!
Posted Image
http://img.photobucket.com/albums/1003/lverburg/AWDML%20Photos/AWDMLSuppliesGraphic.gif
Markers: Copic

{Cards} Copics, Dies, Summer Fresh!


What do you get when you combine awesome Sizzix dies, Hero Arts Stamps, Copic markers and Summer Fresh paper from Simple Stories? 
Shelly here, with the answer to that question: you get beautiful cards full of rich colors, dimension, hand colored die cut images and more. Check it out...
This "Happy Day" A2 size card is on a green cardstock base, boasts two pennants (WRMK) and a die cut, pop dotted butterfly from the Butterflies #3 collection of stamps and dies from Sizzix and Hero Arts. Here's the inside:
As you will see throughout this collection the Butterflies #3 stamps and dies have been used to create pretty (and dimensional) flowers and butterflies.
On the card below you will see flowers layered on top of each other (pop dotted), the word "Love" die cut from a mat piece (also die cut) using Tim Holtz Alterations from Sizzix "Ornamental" die and "Love" movers and shapers die.
The 6x6 paper pad from Simple Stories containing the Summer Fresh line of papers and tiny/small die cut journaling pieces and titles works great on cards. (Inside below):
A flip card...
...allows the butterfly to peak through and be seen from the front and the "inside" of the card when it is "flipped".
This card was die cut from a Sizzix Flip-Card die. It is about 5"x5" so it will require a larger envelope than an A2 size card will use.
And one final A2 size card, again featuring die cut stamped images colored with Copic markers to create vibrate, beautiful die cut images. (Use dimensional pop dots to give your die cut shapes a bit of a "wow" factor!)
 And the inside:
I hope you enjoyed taking a look at some fun summer cards you can create using dies, papers, and markers all purchased at The Scrapbooking Studio, Moline, IL.

Wednesday, July 25, 2012

{Copic Class} August 29, 2012 6-8pm

August Copic Card Class 
August 29, 2012 6-8pm
 1623 5th Avenue, Moline, IL 61265
Cost $19/kit
Register by calling (309) 736-7242


Create five gorgeous cards using the newest line of paper from Crate Paper, Lawn Fawn, Hero Arts/Sizzix, Stamps and sizzlets dies, flip-it die card, fluffy ribbons, brads, twine, and more. Studetns will use Copics markers to color wood, stamped images, die cut images, and some very tiny places! Use blending tool and Distress Ink to enhance the look of these pretty sewing themed papers and stamped images.
 It will be SEW nice to see you at class!

Bring to Class: adhesive, glue dots, pop dots (large and small), pointy scissors to fussy cut some images and to trim ribbon, hole punch (small), Chestnut & Pink cat eye ink pads. We will be using the following Copic Markers in class: BG13, BG15, YG99, YG0000, YG00, YG01, YG05, E13, E15,YG61, YG63, YG91, YG95, YG99, BG13, C7, R20, R21, R22, R35, R39, B41, B45 & Colorless Blender & several Atyou Spica Glitter Pens (Chocolate, Blossom, Clear, and Mint). If you don't have any or all of the markers you can use mine duirng class.


CALL TODAY TO REGISTER: (309) 736-7242

Monday, July 23, 2012

{Class} "Cherish" Butterfly Mini-Ablum


"Cherish" Butterfly Mini-Ablum

By, Shelly Maxwell      
Sunday, August 29, 2012 2-5pm  Cost $29.00/kit
Adorable and pretty is the way to describe this seven-page butterfly shaped mini-album that uses My Mind's Eye papers and embellishments and Jillibean Soup's blue currogated butterfly mini, along with yards of gorgeous ribbons! You'll learn how to ink using Ranger's Distress Ink, use Ranger Stain on the mini-album pages, stamp on sticky-back canvas, patterned paper layering, and use Ranger's tissue tape to create a pocket to hold all of your memories and memorabilia! Nearly all paper cutting is done before class by me so that we can focus on techniques and getting the album completed during our time together. Class kits include project photos, instructions, mini-album, photo mats, embellishments, ribbons, pins, twine, buttons, die cut shapes and more!
Bring to class: Adhesive (tape runner, glue dots, pop dots),  paper trimmer for photos, Ranger blending tool if you have one or use mine along with two foam applicators for Dristress Ink in Iced Spruce & Peeled Paint, a craft sheet to work on at your spot.


Register Today! There are only a few seats available for this class due to supply quantities. Call The Scrapbooking Studio to register: (309) 736-7242
The Scrapbooking Studio, 1623 5th Avenue, Moline, IL 61265

Sunday, July 22, 2012

{Class} Butterfly Mini-Album August 26, 2012 2pm-5pm


"Cherish" Butterfly Mini-Ablum

By, Shelly Maxwell      
Sunday, August 29, 2012 2-5pm  Cost $29.00/kit
Adorable and pretty is the way to describe this seven-page butterfly shaped mini-album that uses My Mind's Eye papers and embellishments and Jillibean Soup's blue currogated butterfly mini, along with yards of gorgeous ribbons! You'll learn how to ink using Ranger's Distress Ink, use Ranger Stain on the mini-album pages, stamp on sticky-back canvas, patterned paper layering, and use Ranger's tissue tape to create a pocket to hold all of your memories and memorabilia! Nearly all paper cutting is done before class by me so that we can focus on techniques and getting the album completed during our time together. Class kits include project photos, instructions, mini-album, photo mats, embellishments, ribbons, pins, twine, buttons, die cut shapes and more!
Bring to class: Adhesive (tape runner, glue dots, pop dots),  paper trimmer for photos, Ranger blending tool if you have one or use mine along with two foam applicators for Dristress Ink in Iced Spruce & Peeled Paint, a craft sheet to work on at your spot.


Register Today! There are only a few seats available for this class due to supply quantities. Call The Scrapbooking Studio to register: (309) 736-7242
The Scrapbooking Studio, 1623 5th Avenue, Moline, IL 61265

Friday, July 20, 2012

{Card} Matchbook Die


Hello Card Makers!! Shelly here with a look at a match book style card. I  used Ranger's Matchbook die and Simple Stories Summer Fresh 6x6 paper pad to create this approx. 2"x3" card:
The above photo is the front of the match book card/mini. And here's a peak inside the cover:
You can see that I've layered several pages together.  The journaling cards and small pages in the 6x6 pad lend themselves to this type of smaller project. They turn out adorable. I used the Ranger Tiny Attacher at the bottom of the book to hold all the layers together. I covered the staple with a piece of patterned paper.
This paper and die are so much fun to use together you just have to give it a try! Remember, you can purchase all of the these items at The Scrapbooking Studio, Moline, IL

{Sale} Copic Markers $5.99!!!


Posted Image
Copic Markers are alcohol-based markers that become acid free as soon as the alcohol dries. The thing that makes them different from water based markers is that they don't tear up the surface of the paper as you layer one color on top of another. This does happen with water based markers. Layering the colors is what will give your stamped image those awesome shaded areas!
Copic markers are available is several different types (Sketch, Copic, and Ciao among others). The difference between these types is the number of colors they are available in (The Sketch Marker is available in 358 colors, the Copic Marker comes in  214 colors, and the Ciao is available in 180 colors), their airbrush compatibility, nib types that you can use in them, and ink capacity in the barrel of the marker.

The Ciao Markers hold the least amount of ink and therefore are usually a little less expensive then the others. The Copic has the most nib choices. All markers are refilled with the same type of ink. Refills are available so NEVER through away your Copic Makers!!!
All Copic markers are labeled with embedded information so it will never rub off!


Posted Image

Copic Markes on Sale

July 20, 2012-July 27, 2012 

for only

$5.99

Thursday, July 19, 2012

{Tutorial} Create a Chipboard Word Banner


Posted Image
 My daughter has been after my husband and I to paint her bedroom for quite a while. She's 13 now and has her very own tastes. I know I'll need to spend a lot of $ on window coverings for her room; so I am saving a few pennies by making a few fun room decorations myself (and really cheap too!).  Julianne is a sweet young lady and so I thought the word "Sweet" really was appropriate for her. I choose colors to match her new paint for my background/main color on the banner. Her paint color is Turquoise, so I am hoping this will match pretty well. :)
Here's how you can create a banner too!
Step 1: Gather your supplies: die cut chipboard banner pieces. I cut mine with chipboard and an Accucut machine die. Also, your chipboard letters for your word. I used Making Memories 8" chipboard letters, and Bo BunnyMy Word 6" Chipboard letters. You'll also need some mist, stain, and ink to color the chipboard to match the room it will be hung in when you're finished.
 Step 2: Use a stain to color the chipboard quickly. I worked in a circular motion keeping the outer edge of the color continuously wet to help prevent any lines. 
TIP: Stains are a great way to color chipboard quickly and inexpensively especially if the piece is detailed and would be hard to cover neatly with paper! They also dry really fast.
Step 3: Use a heat tool to dry the chipboard. You will see the color of the chipboard change once it dries.
Step 4: Use a blending tool and a Ranger Distress Ink in a similar color and distress the edges of the chipboard with the ink. Remember to bring start inking off the edge of the project and bring the color up onto the surface of the chipboard working in a circular motion to avoid lines.
Step 5:  Coloring the chipboard letters: begin by either creating your own custom color (add one squirt of dye ink reinker into a Mini-Mister with a smidgen of Perfect Pearls and the rest water, shake, spray) or use a pre-made mist like Glimmer Mist, Maya Mist, etc. 
Spray the mist onto the chipboard letters. The Making Memories letters were white already, so I just needed to add a little bit of spray to them. The Bo Bunny letters were brown, so I sanded their surfaces to create areas that would absorb some of the color.
Again, use the heat tool to dry the letters.
Step 6: Lay out all the parts of your banner to see if you like how the banner pieces match your chipboard letters. I went back and added a little Distress Ink to my 8" white letters to help out line them a little bit. Once you're happy with how the banner looks, use a tape runner and/or glue dots to adhere the letters down to the banner pieces. 
Note: I left the right side of my "W" unattached to that it could move about freely and not make the angle of the how the banner will hang look awkward.
Step 7: Use a Crop-a-Dile to punch holes into the upper corners of the banner pieces. Overlap the corners so the holes match up from top to bottom. Place brads through the holes to hold all the sections together. Place a hinged ring through each end hole to hang it on the wall when you're done.
I used Prima flowers and a Prima metal lock to adorn a ribbon bow, larger Prima flower, smaller bow etc. all layered together.
On the "W" and throughout the banner I used Pre-made Prima flowers adhered with glue dots to adorn the letters and make the banner co-hesive. The butterfly was colored with Copic markers.
Thanks for taking a peak!
Posted Image
http://img.photobucket.com/albums/1003/lverburg/AWDML%20Photos/AWDMLSuppliesGraphic.gif
Banner: Chipboard die cut pieces (Accucut)
Ranger Distress ink Inks/Stains:  Squeezed LemonadePeacock FeathersShaded LilacBroken China Stain
Flowers & Lock: Prima
Jump Rings: Ranger
Brads: Teresa Collins
Butterfly: Maya Road
Tools: Accucut or similar die cut machine, Crop-a-Dile