Friday, August 31, 2012

Unity Stamp Sale at AWDML...60% off!


Posted Image
 Unity Stamp Company
Unity Stamps are on sale this week at AWDML. You won't want to miss out on this incredible offer: Unity stamps are 60% off! Unity Stamp company is an American manufacturer of high quality rubber stamps with cling foam backing for use with acrylic handles. They are pre-cut and ready to use right out of the package. Their images are amazing.
Unity Stamp Company was started in 2007 by a family of six who had a background in the stamping industry. Now they have over 21 employees and create stamps in conjunction with several partner companies. Spellbinder dies is one example of this partnership.
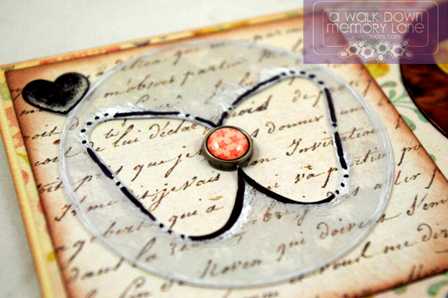
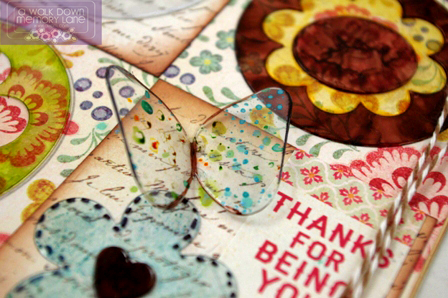
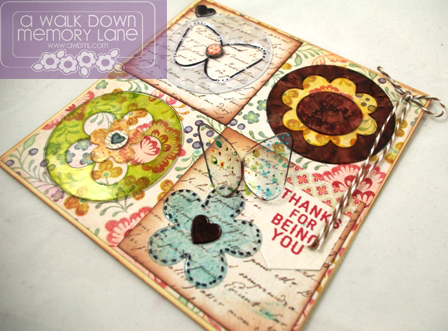
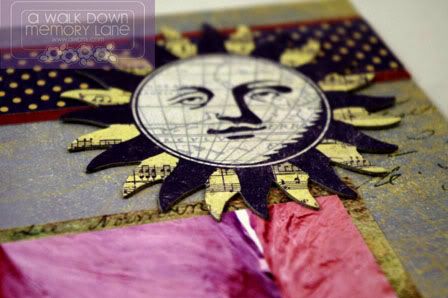
I used my Blossom Spellbinder die set and the Unity Blossom Stamp set to create this A2 size pocket thank you card. I tucked a few tags into the pocket (perfect for a group gift-each person can add their own sentiment on a tag), a gift card would work great in the pocket too.
Here's a look at the tags-I used a journaling stamp on the pink paper and fussy cut the image, then adhered it to the black tag. I used a label Spellbinder die to cut out the pink shape on the left tag.
I layered several die cut shapes to create the front adornment. Small pop dots added dimension.
 Check out ALL the Unity Stamps at AWDML this week.
 Unity stamps are 60% off
August 31, 2012 through Thursday, Sept. 6, 2012!
Posted Image


Wednesday, August 29, 2012

{Tips and Techniques} Acrylic Embellishments
By Shelly Maxwell
Posted Image
Ever wonder what to do with acrylic embellishments? Hi! Shelly here with some fun tips and techniques you can try on acrylic to really make your card, embellishment or altered item really stand out.

I've chosen to work with a collection of circle acrylic icons from a package offered by Fancy Pants Designs to work with on my 6x6 card. I used a mixture of butterfly and flower shapes.

First, I painted with acrylic paint around the outside edges of the circle and on the inside edges of the butterfly. I used a Sharpie marker to draw lines around the butterfly to enhance the outline. Jet Black Staz On ink on the small heart and a MME brad for the butterfly's body.
Posted Image
Copic markers work REALLY WELL on acrylic! I used a brown and yellow to create the sunflower here:
Posted Image
Next, I used Adirondack alcohol inks on a felt applicator with blending solution and dabbed it on the backside of the green flower (lower left card front) and a sprayed mixture of Ranger reinker dye ink + water + Perfect Pearls on the small inner flower, fluttering butterfly, and blue flower shown here:
Posted Image
Again, I used the brown Copic Marker to color the tiny heart and a Sharpie marker to draw faux stitching lines around the outside of the flower.

HINT: Run the acrylic pieces through your Xyron so that no adhesive is seen from the front of your project. Use glue dots for things like the dimensional butterfly.

Try creating something fun with acrylic today! You will love the possibilities it offers to the creative crafter!
Posted Image
The Fancy Pants acrylic set includes arrows, hearts, tabs, and enough acrylic pages to complete to mini-albums.

The best news is the acrylic is on sale:

Fancy Pants Transparent Diecuts - $5 from $14.99


Posted Image

Posted Image
Acrylic Pieces:Fancy Pants Designs Clear Mix & Match transparent die cuts
Inks/Pens/Paints: Staz On Jet Black InkAdirondack Lettuce Alcohol InkBlending Solution, Copic Markers Honey Y38 and Cashew E79, Adirondack Lights Acrylic Paint Snow Cap
Adhesive: XyronGlue dots
Paper: My Minds Eye The Sweetest Thing Collection: Stickers, Lavender "Fabulous" Flowery Paper, Lavender Collage paper 

Monday, August 27, 2012

{Challenge} Use Acrylic!


Hello! Shelly here with a Challenge for you: USE ACRYLIC on your next card, layout, or craft project.

I love all the possibilities acrylic offers to me when I am in a creative mood. If you can think it up you can probably do it to acrylic!! Do you know you can paint, ink, use Copic Markers and use alcohol inks on acrylic? Well, you can and it turns out beautiful.
I love Halloween, so when I got my hands on the newest Authentique Halloween line and mixed it with Fancy Pants Designs Clear Mix and Match transparent die cuts I knew I had a mini-album just waiting to emerge...
Use Staz On Ink to darken edges and give the project an eerie appeal & Halloween charm from jewelry to complete the worn look.
Alcohol inks in orange, green, and purple give the acrylic a modeled background appearance. Use alcohol inks on felt pad with blending solution and dab onto acrylic.
Run papers through the Xyron before adhering to the acrylic page to help hide the adhesive. Use double sided papers so you can take full advantage of the see-thru acylic.
Use left-overs like odd buttons and brads from previous years to embellish the corners of the page.
The Fancy Pants acrylic set includes arrows, hearts, tabs, and enough acrylic pages to complete to mini-albums.

The best news is the acrylic is on sale:

Fancy Pants Transparent Diecuts - $5 from $14.99

Posted Image
Paper: Authentique Enchanted Collection: Haunted, Bewitched, Glowing
Embellishments: Buttons, flowers, twine, brads, silk seam binding, charm from broken jewelry
Inks: Staz On Jet Black Ink, Adirondack Sunset Orange, Purple Twilight and Lettuce Alcohol Inks, Blending Solution
Adhesive: XyronGlue dots

Monday, August 20, 2012


{Product Review} Farm House papers, chipboard, and stickers...
by, Shelly Maxwell

During my visit to CHA in Chicago (July 2012), I was blown away by the Farm House line of papers "Fair Skies" and the matching self-adhesive chipboard, and stickers (both die cut & alphas!) I created this layout using Farm House Fair Skies line of papers and embellishments and some photos from our family vacation to Arches National Park (yes, it really is that reddish pink color).

Posted Image


Posted Image

Here's a closer look at some of the chipboard pieces:

Posted Image

I love this sun image!
Posted Image
The alpha stickers were the perfect match for the rest of the layout.
Posted Image

The sticker quality from Farm House is exquisite-their thick texture gives the stickers a high quality feel. The paper, too, is heavy duty with some texture. It is also double sided which is always easier on the pocketbook! The adhesive backed chipboard really sticks to the layouts and the art work is beautiful. I loved working with the rich feel of the papers and embellishments. If I had to change anything about this collection it would be that I would want more alpha stickers especially more numbers. I think Farm House is a line of products we will be seeing a lot more of both in stores and on-line too so keep your eyes peeled for their products. 


Posted Image
Posted Image
Paper: Farm House Paper Co. Fair Skies Collection-Goodways, Flutter, Breeze, and Flowing Winds
Stickers/Chipboard: Farm House Paper Co.
Pens: Spica Glitter Pens
Tools: Photo corner punch
Fiber: Farm House Paper Co., MME Ribbon

{Tutorial} Creating the perfect bow-Every Time!


Posted Image
Shelly here with a bow-tying tutorial. I love using ribbons and bows on my cards and layouts so the day I learned this bow making trick it changed my bow making life forever. It was dramatic for me to see perfect bows every time once I learned (and practiced) this bow tying technique. The "Bunny Ear Bow" technique was taught to me several years ago at an in-home card making class. Ribbon has not gotten the best of me since! Here's how it works:
1. Fold a piece of ribbon in half.
TIP: I usually use 1/4" ribbon so I cut about a 6" piece. If the ribbon you choose to use is wider than that you will need a longer piece of ribbon.
 
2. Keeping the ends of the ribbon even with each other, loop the ribbon around your left and right index fingers.
 

3. Place one loop over the other loop. (I'm right handed and I usually place the left over the right).
 

4. Tuck the loop on top behind and back through the hole created by the two overlapping loops.
5. Pull on both loops causing the bow to tighten in the middle.
 
6. First pull on the loops and then the ends of the bows until the bow is the size you wanted it to be and tight enough to stay together.
 

7. Trim the ribbon ends at a slant or fold the ribbon ends in half and starting about 1/8" up from the end of the ribbon and at a slight diagonal slant chunk of the ribbon off creating a "V" shaped end.
 
8. Use glue dots to adhere ribbon to your card, layout or projects.
Here's a 5"x5" top fold card I created using four bows from four different ribbons in coordinating colors that match the designer paper on the card. I used pop dots behind just two of the four blue mats, and I used very tiny pop dots behind the stamped greeting on the small tag in the upper left corner of the card. I did adhere the tag to the front of the card so that it would easily slip into an envelope.
 
Posted Image
Tools: Tag, label, square scallop, and 3/4" square punches
Adhesive: glue dots, pop dots
Ribbon/Fibers: My Minds Eye, Twinery Twine, Creative Expressions, Bazzill

Thursday, August 9, 2012

{Blingy Thingy}


Posted Image
Bling can be used to enhance and draw attention to embellishments on cards, layouts, tags and more! Want 2 Scrap bling that I used on  my card project was perfectly small enought to  work wonderfully on smaller projects like cards or for flower centers. I created this "a pocket full of happy wishes" all-occasion card using clear bling (sometimes colored with Copic markers) and blue green bling (flower center).
After I used small flower punches on paper scraps to create my pocket full of flowers I placed bling in the center of the flowers. I layered the flowers with pop dots to give some of them a bit of dimension. HINT: Use green, red, and orange Copic makers to color the clear bling to match the paper.
I used the red stamped stitches as a guide for clear bling placement on the lower portion of the pocket.
How do you use bling?  Whatever ways you've discovered to include a little something shiney in your projects I would love to hear about it-so leave me a comment. Don't forget the Want 2 Scrap bling is on sale this week at AWDML!
 All Want 2 Scrap NestaBling regularly priced at $3.49 are on sale for $2!! See what’s available HERE.

Posted Image
          

Other:Maya Road label, red fiber, pop dots