Showing posts with label Inky Antics. Show all posts

Sunday, August 30, 2015

Scrapmania Copic Card Class-Sept. 30, 2015 6-8PM

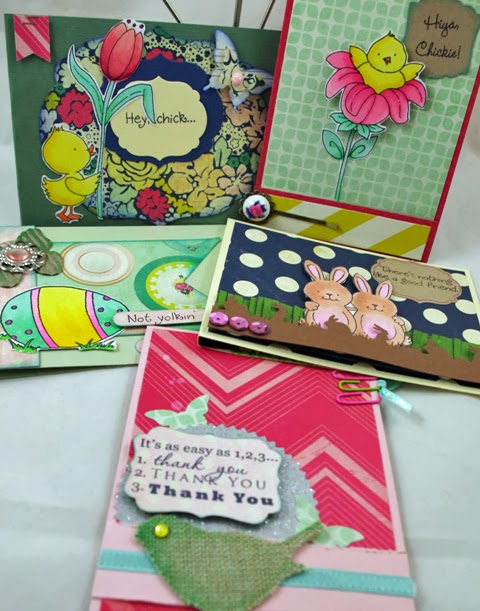
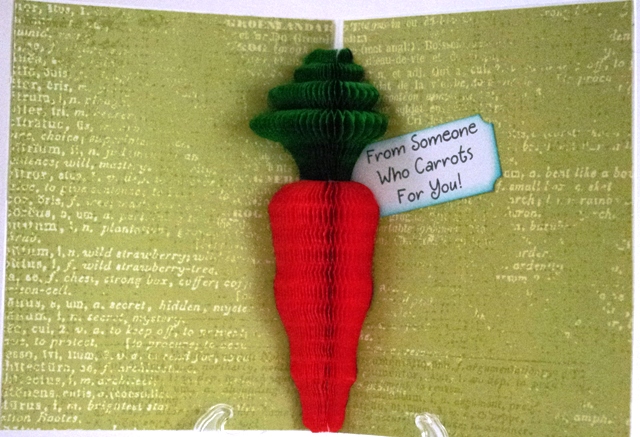
Join me on Wednesday, September 30, 2015 from 6-8PM at Scrapmania in Cedar Rapdis, IA as we create five cards using Copic Marker techniques.
  • Call to register: 319-377-9999. 
  • If class is full you may order a kit for the same price of only $23.00 each.

 We will create a background using Copic Markers and the Tim Holtz Spritzing Tool:

 
Each Student will receive as part of their class kit a bottle of Rose Gold Stickles which we will be using to add a bit of sparkle to our cards:
 Image result for rose gold stickles
Learn how to add shading to your stamped images for great looking cards:

 We will color on wood with our Copic markers-learn how wood and Copics work together to create beautiful embellishments for cards and other crafts:
Please Bring the following Copic Markers to class with you: E00, E02, BV20 BV25, R02, R05, E53, E55, E57, Y32 (please bring these to class with you). We will also be using these Copic Markers in class; but not as much as the one listed above: Y11, Y13, Y38, E08, E37, E59 (you may borrow these if you don't already own them) and the last two we will only use a very small amount: R24, YG05.

You will also need the following items for class: your favorite adhesive, glue pen, glue dots, large and small pop dots. Wink of Stella pens: clear, black, brown, light gree, pink, red, and silver.
(Teacher Fee $14.00 Class Supply Fee $9.00) 
Total $23/kit

Sunday, February 16, 2014

Copic Card Class: Register Now!

Registration is now open:
Easter/Spring Copic Card class
March 12, 2014 from 6-8PM
 The Scrapbooking Studio, Moline, IL
We will be creating five cards using Inky Antics stamps and honeycomb papers, Crate Paper paper and embellishments, and tons more! Cards include two Easter themed, one birthday, one thank-you and one spring card.
 Join me, Shelly Maxwell, from 6-8PM on March 12, 2014 for a great evening developing your Copic Marker skills. Cost is $20/kit. (If you are unavailable to attend class a kit can be reserved for you to pick up at the store).
 We will be making three cards that incorporate Honeycomb papers like this:
 Crate paper paper and embellishments will be used along with many other trendy trinkets.


 Don't miss out on all the fun! Register today by calling The Scrapbooking Studio at (309) 736-7242. Seats fill up fast so please don't hesitate to call.

 We will be using the following markers in class: Y02, Y04, Y08, R30, R35, R39 G00, G02, RV21, RV23, RV25, RV29, RV93, RV95, E11, E13, E15, RV00, RV02, RV04, Colorless blender and the following Spica Glitter pens: Melon, Lemon, Pink, Orange. You will need to bring your own adhesive and I recommend a glue pen for this glass as well as pop dots (large and small). We will also use Cat Eye inks in the following colors: Sour Apple and Royal Blue.

Tuesday, June 18, 2013

Copic Card Class: July 24, 2013 6-8pm


Class Description: We will create five cards using Copic Markers (see list below), Fancy Pants Designs Down by the Shore line of papers, Wendy Vecchi Gossip about Art, Stampendous, and Inky Antics stamps to adorn this summery collection of birthday, friendship, hello,and thinking of you cards. Don't have all the markers? No worries-you can use mine during class! Please bring the following with you: pop dots, glue dots, adhesive, pointy scissors for cutting stamped images and twine. Also, we will be using the Tim Holtz tiny attacher during class so you may want to bring that along as well. Cost $19 Reserve your space by calling Holly at 309-736-7242 The Scrapbooking Studio, 1623 5th Avenue,  Moline, IL 61265
Date: July 24, 2013
Time: 6-8pm 
Copic markers are 25% off during class and other Copic products are 20% off during class.

Markers used: YG01, YG05, W3, W5, E00, E04, E11, E13, E31, E33, E35, E37, B02, B04, B41, B45, R12, R24, R27, BG10, BG11, BG15, Y000, Y00, C0, C2, C5, C7, G43, G46, G82, G85 Colorless blender, Spicas: Pitch Black, Peach, Red, Clear, Baby Blue

Friday, April 5, 2013

{Layout} BoBunny's Isabella Collection

 Create beautifully elegant layouts using BoBunny's newest line of papers and embellishments, "Isabella" designed with butterfly, floral and lace motifs. This collection offers diversity and great compatibility due to the muted grey and cream undertones throughout the pieces. It really allows virtually any color pictures (or black and white pics) to match with the background papers.
 I coupled Inky Antic's saying stamp with fussy cut journaling tags and paper embellishments to create three layers of butterflies, lace, and interest.
 The matching 12 x 12 chipboard sheet is self-adhesive and contains numerous sized pieces to work with including butterflies & swirls.
I love the touch of yellow that was added to some of the butterflies! Stop by The Scrapbooking Studio, 1623 5th Avenue, Moline, IL 61265 to grab the entire collection. You'll want every piece. :)

Wednesday, February 27, 2013

{Class} Copic Cards March 27 6-8pm The Scrapbooking Studio

Create these five silly Spring Cards using stamps from Inky Antics, October Afternoon, papers from October Afternoon, My Mind's Eye, Reminisce, Echo Park, and jillibean soup. Techniques to color using Copic Markers on vellum, wood, fabric/textured images and more!


Find out how to create fun dimensional cards like this one:

Join me, Shelly Maxwell, on Wednesday, March 27, 2013 from 6-8pm. All Copic products are 25% off during class time-so this is an excellent time to stock up on markers, refills, Spica glitter pens and more. Call the store to register at 309-736-7242 Cost is $19. The Scrapbooking Studio, 1623 5th Avenue, Moline, IL 61265


Friday, February 24, 2012

{Product Review} Inky Antics: HoneyPOP 3D Collection

The HoneyPOP 3D Collection from Inky Antics is a great product to pick up the next time you're in a scrappy place like AWDML. The 3D papers add a "WOW" factor to your projects and cards in a way I haven't really seen before! I love the festive layer the honeycomb feature adds to cards. The reaction I received when I showed my kids was, "Oh, cool. I like that." (They see a lot of cards-so to actually get a sentence as a reaction is pretty big).

Here's a card I created using the Inky Antics Carrot Bunny HoneyPOP set:


You'll love how easy it is to create great cards with the easy to use Inky Antics Honey Pop 3D Collection. Your friends will say, "Wow, that's cool. How did you do that?" The great thing about Inky Antics HoneyPOP 3D stamps is that the package comes with well written directions that are easy to follow. You'll also want to grab some HoneyPOP paper pads along with the stamps.

I also love that the stamp collections come with great quality acrylic stamps. The sayings are awesome too! Inky Antics not only include greetings for the outside of the card; but the inside of the card too. The cute image style and quippy sayings even make grown-ups giggle.


Hint: I used glue lines in the 1/8" gutter of the card to really hold the HoneyPop paper in place.

Supplies:
Stamps-Inky Antics 11029MC Carrot Bunny HoneyPOP Set
Paper-Inky Antics HoneyPOP paper in goldenrod and green, Little Yellow Bicycle
Pens-Copics Atyou Spica glitter pens
Adhesive: Glue lines
Ink: Colorbox Cat Eye Ink pads, Memento Black Tuxedo Ink Pad
Tools: EK Success scissors, EK Success punches, EK Success Martha Stewart scoring tool

Wednesday, February 22, 2012

{Tip/Technique} Add Dimension & Texture

Adding Dimension and Texture to your project adds interest too. Don't hesitate to include ribbon, dimension (with pop dots) or with Honey Pop paper from Inky Antics (a featured manufacturer this month at A Walk Down Memory Lane) or pins, etc. You will love the "WOW" factor!
Here's how to do it:
Create a ribbon tab by folding a 2" piece of ribbon in half and staple it to the project with a Tiny Attacher.
I like to add ribbons as borders (run the ribbon through your Xyron first to make them stick the entire length of the ribbon) or use glue dots or staples (especially on guy themed projects).


Stamp the image on to the Honey Pop paper lining up the arrows on the stamp with those on the paper. Use pointy scissors to fussy cut the stamped image. Fold your A2 size card at 4 3/16 and 4 5/16 creating a gutter in fold of the card. Adhere the honey comb paper along both sides of the fold with the flat edge of the cut out piece in the fold.


"WOW", right?
Here's the card's front:
Dimension was added to the card front by using pop dots (both small and large) to create several layers and by tucking a pin with pennant to the top of the cupcake. Create a sweet cards using dimension for added interest and a great "WOW" factor. 

Supplies:
Papers: MME, Bazzill
Stamps: Inky Antics Cupcake Birdy, Inky Antics  Forest Friends #2
Ink Pads: Memento Tuxedo Black, Colorbox Cat Eye Ink Pads
Adhesive: Xyron, Pop Dots
Tools: Martha Stewart scoring tool, EK Success corner punch & label punch, label punch,  pointy scissors