Saturday, April 28, 2012

{Challenge} Use Yellow on a Card or Layout


Posted Image
Create a card or layout using the color YELLOW! It's Springy out there in the world so why not add a bit of yellow springy cheer? I love the new Fabrication papers from Teresa Collins and all of the floral stamps that are available now.
Here's my card sample using yellow printed papers and several Copic markers from the yellow family:
To create a card like this one cut cardstock 4" x 11" and fold at 5.5". Use a border punch along the front bottom edge of the paper. Use a mat for background behind stamped image like the scallop mat I cut using an Accucut die and machine. Next stamp an image onto paper and color in with markers or water color pencils. Adhere stamped image to a mat in a similar shape to the stamped image (oval in my sample). Use ribbon to visually anchor mat/stamped image to lower section of the card. Use pop dots to add even more dimension when adhering stamped image/mat to card front. Stamp small greeting and tuck behind stam
ped image. Cut inside card liner in matching cardstock color and adhere to inside of card so that it shows through the punched lower border.
Copics:
http://img.photobucket.com/albums/1003/lverburg/AWDML%20Photos/AWDMLSuppliesGraphic.gif
Papers: Bazzill cardstock, Teresa Collins Fabrications Yellow Flower
Stamps: Inky Antics Oval Tulips, Hero Arts "Just for You"
Pens/Markers: Copic (See Photo inset with colors), Spica glitter pens in Garnet, mint, lemon, orange, and clear
Punches: Martha Stewart border punch, Stampin' Up small oval punch
Dies: Spellbinder, Accucut
Ribbon: Little Black Dress Designs Lip Smackin' Ribbon Ensemble-Green
Adhesive: Pop dots
Posted Image

Friday, April 27, 2012

U R Gonna Flip for Sizzix {Flip-its Cards}

Making these cards was easy and fun with the Sizzix Card die "Diamond Flip Its" designed by Stephanie Barnard and available at The Scrapbooking Studio in Moline, IL 
 I used Simple Stories line Awesome Me to create the Congrats card perfect for any young man. I fussy cut several of the journaling cards to use as the die cut images on the card, and concentric circle punches for the circle embellishments. Doodlebug "Congrats" sticker helps me send the perfect greeting.

Here's what the Sizzix die looks like:
It fits in the Vagabond and Big shot among other machines.
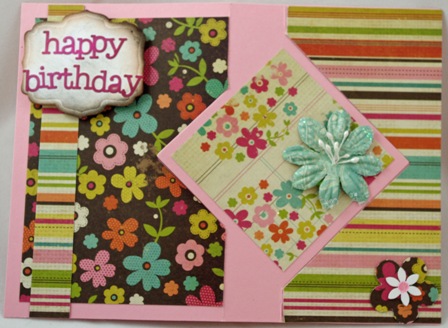
 Here's another card I created using the Sizzix Diamond Flip-its die. The Happy Birthday card below uses Simple Stories Fab{U}lous line of papers, Prima flowers, Spellbinder dies and Doodlebug stickers for the greeting.
 Here's what it looks like fully extendend....
My final card I would like to share with you today also uses Simple Stories papers, but it also uses Hero Arts stamp and die cut set! If you haven't gotten a chance to use these collections yet you must put it on your card making "To do" list!

 First adhere the high quality Hero Arts cling rubber stamps to an acrylic handle and then stamp the images, color the images with Copic markers and die cut the images using the Sizzix Framelits metal cutting dies included in the set. The Framelits work in the Big Shot, Cuttlebug, and Vagabond machines plus more.
 Again, I used the Doodle bug "Thank You" stickers for the greeting. I used EK Success's corner punch for the photo corners on this card.

Featured Dies/Stamps: Sizzix Hero Arts stamp & die Floral set 

Check all these great products out at the brick & mortar: The Scrapbooking Studio at 1623 5th Avenue in  Moline, IL.


Tuesday, April 17, 2012

{Fabulous Friday) AWDML Sale!


Posted Image
Flower Soft Mix Spring - Click Image to Close
Flower Soft is from Katy Sue Designs, famous for developing the embellishment which brings to life your floral accents with its stunning 3D textural effect. Sprinkle it on like glitter over the adhesive and create textured and delicate results for foliage and floral designs (and lots of other designs too, like snow).
On this Congratulations Way 2 Go! card I used the spring mix in the center of the flower and ocean around the outside of the flower center. The pointy tip on the glue applicator is a great asset to help get the Flower Soft exactly where you want it! I used sage on the veins of the green flower and ocean again for the body of the butterfly on the flip-side of the card.


Flower Soft is on Sale April 13, 2012 through April 19, 2012
Flower Soft - Individual colors $3.50
 Posted Image
Posted Image
Embellishments: Flower Soft in the following three colors: Soft SpringSage, and Ocean
Rub-on: Pebbles-Congratulations, Spica Glitter pens for outline and blue accents
Paper: Theresa Collins Fabrications, Bazzill
Flowers: Prima and Maya Road
Dies: Sizzix-Card Diamond Flip-its, Memory Box-Small Pinwheel Posie, Spellbinders-Ribbon Banners
Punches: Martha Stewart-Leaf, Stampin' Up-ovals and scalloped ovals

Thursday, April 12, 2012

{Tutorial} 5 Ways to Use Maya Mists


Posted Image
Tired of using your mists the same way every time? Try one of these five mist techniques and pump up the mist! I will show you how to create this layout using five different mist techniques (but there are tons more!)I choose three Maya Mists from Maya Road. Here's my layout:
1. Collect one sheet of Kraft 12x12 paper and one 5x7 photo. Prepare your work area. I always use a craft mat under my work when I am using any mists. I also create an overspray barrier with chipboard to protect my surrounding area or I use my Colorbox Color Catcher if the project is small enough (this works great with ribbons, flowers, chipboard shapes but is not large enough for a 12x12 piece of cardstock).  I also use a Ranger scrubbie to help clean the ink off of my hands when I am done with all of my misting.
2. The first misting technique is to use it with a mask. I choose a larger mask to use as the title block. (Hint: both of the masks I've used in this tutorial are by Prima, but several companies make masks for mists or you can create your own using punches & die cut paper).
3. Spray your first mist choice. I choose Earl Grey Maya Mist. I sprayed very lightly using 2-3 squirts. Remove mask from layout.
4. Place second mask in lower right corner of 12x12 paper.
5. Use second mist color and once again spray 2-3 sprays over the mask.
6. Remove the mask to reveal a totally cool design!

7. The second mist technique is to use the sprays on fabrics-like fabric flowers from Bella Blvd. (Blooms-a-Bella in Bianca works great as a base to add the mists to).  Spray each layer of the flower (you may want to do front and back of each layer to really get the color on each petal).

8. The third mist technique involves chipboard. Mists are one of my favorite ways to color chipboard! The color goes on evenly and it is a really fast way to cover a lot of chipboard fast. I used Maya Road chipboard alphas for my layout title so, of course I had to mist them and I used a third mist color.

9. The fourth mist technique is ribbon. I like misting white silk seam binding for these types of projects. White lace also works really well. Crumple the ribbon in your hand and place on your craft mat. Spray the ribbon a little bit, scrunch up the ribbon again and spray again. Continue on in this manner until you've achieved the level of coverage on the ribbon that your want. Allow the ribbon to dry. (Use a heat tool if desired).

10. The fifth mist technique is to use it to spray onto white flowers such as Prima's white paper flowers. Again, lightly spray 2-3 times, turn the flowers to cover all the parts of each petal (you may want to spray the back sides too).

11. Now add all your parts and pieces to your layout! Use a glue pen or a Xyron to add adhesive to the backsides of the chipboard letters and adhere in the title area. I added a large brad to one of my paper flowers and attached with a glue dot to the top of the "Pure Talent" sign. Two small flowers adorn the lower section.

12. Adhere a bow tied from the ribbon to the center of the Blooms-a-Bella flower and attach the entire flower to the lower right corner of the layout. Add two journal spots, and another paper flower with button/twine center to the lower right cluster.


  
   
Other: Maya Road Mists in Blue Raspberry Metallic and Hydrangea Blue, Prima Mask

Starting today until April 12th, all Blooms A Bella are $2.99!!
*Sale does not apply to the baby blooms

Posted Image

Tuesday, April 3, 2012

{Tip & Technique} Creating Masculine Layouts


Posted Image
It can be a challenge finding supplies to create masculine layouts for men and young men. I am on constant high alert for masculine embellishments & techniques! Today I would like to share a few of the ideas I've picked up along the way. For example, I look at current clothing styles (particularly boy's t-shirts) to see what shapes appear over and over or what themes seem to be popular-a lot of times the shapes I see are geometric like circles, lines, and stars. Another way to add masculinity to a layout is with texture: try using Sizzix embossing folders on Core' dinations kraft core paper and then sanding the paper to give it a distressed look (there is some in the layout below tucked behind the photos and the stars too). Anything metal adds to the masculinity as well-like silver brads (I've put a few in the centers of the stars), buckles, silver paint. Also, wooden embellishments like Maya Road bingo markers are a great way to make it manly (I've used a Maya Road star bingo marker to visually anchor the horizontal fabric strip). I've used a variety of these masculine techniques along with Studio Calico's Elementary Collection which is PERFECT for creating the more masculine layouts. The vertical lines, journaling cards, and fabric strips add the perfect amount of masculinity to the layout.
I've also added some distress ink around the edges of some of the paper & fabric strips to "dirty" it up a bit. Here's how I use my Ranger blending tool to add distress ink to paper, fabric, and embellishments:
Begin by putting a foam pad onto the blending tool handle and then dabbing it onto a Ranger Distress Ink pad.
Next, place the inked blending pad/tool onto your protected work surface right next to the edge of the paper, picture, embellishment or fabric you are going to distress.
Make very small counter-clockwise circles with the blending tool bringing the inked foam pad onto the edge of the item to be distressed. Remember to keep moving the blending tool as you work your way around the outer edge of the item.
You can begin to see the brown edge I am creating as I work around the picture, blending in a counter-clockwise motion. (This prevents creating visible lines of ink on the object).
Make sure you practice on a scrap first before using your original picture or papers so that you can master this technique!
 Posted Image
Posted Image
Studio Calico paperfabricjournaling cards