Friday, July 13, 2012

{Project} Summer Fresh Mini-Album


Hi scrappers! Shelly here with a project idea to create a great summer mini-album-jammed full of all your greatest summer moments using just a photo mat die and a 6x6 patterned paper pad-like Simple Stories "Summer Fresh". It's super quick and really easy. Here's how:
I cut chipboard and patterned papers using the same die shape (Accucut) to make the assembly of the pages quick and pain free. You may want to ink the paper edges with a blending tool and some distress ink.
I took advantage of all the ADORABLE title pieces, journaling blocks and embellishments (you cut out) included in the 6x6 pad.


Add as many or as few pages as you need to record your family's memories. When you're done with your pages, use a Crop-a-Dile to punch through the chipboard pages (cut one and then use it as the template for the rest of the hole placements). Use hinged rings to fasten them all together.
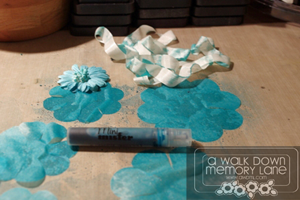
Ribbon bows and punched flower shapes from leftover scrap pieces work great to create the perfect ending!
Thanks for taking a peak at this quick to put together mini-album. Remember, you can purchase all the pieces to create a similar mini-album at The Scrapbooking Studio, Moline, IL.

{Step-by-Step} Creating Custom Mists


{Step-by-Step} Creating Mists Using the newest Ranger Distress Inks:Squeezed Lemonade, Peacock Feathers, Shaded Lilac! 

By, Shelly Maxwell

Posted Image
Step 1: Collect your supplies. You'll need some of the Ranger Inks, Ranger Mini-Misters, and Ranger Perfect Pearls (I used blush and Kiwi). Use a fine point Sharpie Marker to label each of your Misters with the Ink's name. You'll also need some coffee filters, white ribbon, felt, etc. to ink and a heat tool.
Posted Image
Step 2: Open your first Mister, add one dropper full of ink into the Mister.
Posted Image
Step 3: Carefully open one of the Perfect Pearls containers and use a small scoop or tiny spoon to place a smidgen of the Perfect Pearls into the Mister with the ink.
Posted Image
Step 4: Add enough tap water to about 1/4" down from the top of the Mister. Place the cap on the Mister and shake vigorously to mix the ink, pearls, and water.
Step 5: Use coffee filters and a die to cut several different sized flowers. (Ranger's Tattered Florals works great for this).
Posted Image
Step 6: Lay about 1/3 of the die cut flowers onto a covered surface and spray with one of the mists you just created. Use a paper towel to sop up excess overs pray, then dry the flowers using a heat tool. Next, lay down the second 1/3 of die cut flowers, spray with the second color, and so on until all flowers have been sprayed, colored, and dried.

Create beautiful flowers, ribbons, more! Use your new creations on home decor items (like the wreath pictured here), layouts and cards. Have fun creating!!
Posted Image
I used a 12x12 brown paper bag cut into 2" strips, sprayed with ink, dried, and then wrapped around the wreath. I used sticky dots to adhere the coffee filter and Prima inked flowers, inked silk bow, and punched "Welcome" sign.
Posted Image


Supplies:
Inks: Ranger Squeezed LemonadePeacock FeathersShaded Lilac
Supplies: MistersPerfect Pearls, Styrofoam Wreath, Brown paper bags (with print), silk ribbon
Bling: Teresa Collins crystal and brads 
Posted Image
My Blog: paperartbyshelly

Monday, July 9, 2012

{Made You Look Monday} Washi Tape


Posted Image
Shelly here with one of my newest favorite products: Washi Tape! It's manufactured by several vendors, comes in colorful colors, it's easy to use, and looks great on layouts, projects and cards. Washi Tape comes in rolls or approximately 30 feet for about $3.
Here's a layout I created using Bella Blvd. washi tape in Pink Flowers and Pickle Juice Dot:
I used both tapes to create fun borders to frame the photo of my daughter and myself. I also used the tape around the smaller die cut pocket to create and actual pocket to put the pins into:
The upper right photo corners is also washi tape:
So you can see, washi tape is versatile, easy to use (it remains removable for a while after placing it on paper), tears or cuts, and if needed holds little pockets together. It's 30 feet of fun!
You can pick lots of different styles, colors, etc. at AWDML!

Posted Image
Paper: Little Yellow Bicycle Lime StripeDeep Blue Sea SolidDune Blossoms
Embellishments: Washi tape Bella Blvd.  Pink Flowers and Pickle Juice Dot, Maya Road Trinket Pins Vintage Pearl ButterflyTwinery Twine

Friday, July 6, 2012

{Layout} Summer Fresh from Simple Stories


Shelly here with a 12x12 layout I would like to share with you using the Summer Fresh line of papers from Simple Stories (6x6 Pad used here) along with Sizzix Hero Arts Butterflies #3 die/stamp set, and Copic markers.
Have you ever tried to create a layout using  6x6 papers from paper pads? I challenge you to give it a try! The great thing about many of the 6x6 pads (this one especially) is that it contains papers with smaller print papers-perfect for smaller projects, and it also contains several titles, journaling spots, card greetings, and adorable die cuts. I used several of these on this layout.
I also used the Hero Arts die/stamp set Butterflies #3 to create the three butterflies on the layout (they are pop-dotted), I colored them using Copic markers.
Copic Hint: When using Copic markers to color stamped images be sure to use Xpress-It blending paper (it's behind the counter-just ask for it) to stamp the image onto and use Tsukineko's Memento Ink or Distress Ink so that your images don't bleed. 
Love this happy paper line! :)

Wednesday, July 4, 2012

{Challenge} Using 6x6 Paper Pad


Posted Image
I absolutely LOVE the 6x6 paper pads manufacturers are coming out with! I love the smaller prints, love less waste, love having so many options! I recently picked up the new EP Note to Self 6x6 paper pad and created several cards and this layout using it:
I would like to give YOU a challenge to create a layout using ONLY 6x6 paper from paper pads. Let's see what you can create. Here's my 12x12 layout:
And here's a little closer look at some of the papers I used:
I placed two of the same papers together to create a 6x12" mat for my photo. I also cut a 6x6 piece into three 2" strips to create the scalloped border and die cut tab. The zig-zag piece is a sticker from the EP Elements sticker sheet that matches this line of papers. The larger flower was created using a Cosmo Cricket Gluber, burlap, and fabric strips with a Maya Road Bingo marker for the center. The doily was created using a Sizzix die.
Now, come on, it's your turn to create and share! Don't forget this week's sale:

All 6x6 paper pads are on 40%

off June 22, 2012

through June 28, 2012!

Posted Image

http://img.photobucket.com/albums/1003/lverburg/AWDML%20Photos/AWDMLSuppliesGraphic.gif
Dies: Accucut 12x12 die, Sizzix Scrappy Cat Vintage Doily, Graphic 45 Chipboard button with twine

Friday, June 29, 2012

{Cool Die} Sizzix/Hero Arts Butterflies#3


Shelly here with a look at a super versatile die and stamp set from Sizzix and Hero Arts: Butterflies #3 comes with two floral and three butterfly stamps with matching sizzlets dies that cut out each shape perfectly! The stamps are rubber cling mount stamps. The dies are compatible with Sizzix BIGkick, Big Shot & the Vagabond die cutting machines.
Here's a project I created using the die/stamps set and Simple Stories Summer Fresh 6x6 Paper Pad of papers and die cut pieces.
Here's a closer look at the 3D flower:
Cut and color three stamped images (all three should be the same image). Fussy cut around specific parts of the image (I choose the pink petals on the center layer) and attach with small pop dots. Next, do the same for the third layer (this time I choose the brown flower centers) and again attach with pop dots.
I used Copic Markers to color these images.

I'll be sharing more cards, layouts, and projects using this die, Copic markers, and Summer Fresh paper projects throughout the month of July-so check back frequently so that you don't miss anything!

Wednesday, June 27, 2012

{Sale} 6x6 Paper Pads


I absolutely LOVE the 6x6 paper pads manufacturers are coming out with! I love the smaller prints, love less waste, love having so many options! I recently picked up the new EP Note to Self 6x6 paper pad and created several cards and this layout using it.

All 6x6 paper pads are on 40%

off June 22, 2012

through June 28, 2012!


Tuesday, June 26, 2012

{Tips and Techniques} Ink, Embossing & more!


Posted Image
Get your fingers dirty with some ink! I would love to share a few inking techniques and tips with you today.
Hi, Shelly here with a set of gift bag tags you can create and embellish using some great inking techniques such as embossing and inking, and distress inking directly to the surface of your project, and of course stamping.
I created these four tags using chipboard I cut out into the shape of a tag.
Tip: Use a Sizzix tag die or an Accucut tag die for really quick results!
Next, I ran the chipboard tags through my Vagabond machine using various embossing folders from Darice, Sizzix, and Ranger. A Cuttlebug or Big Shot would certainly work just as well.
You can see the embossed edges (Darice)  in the sample above. Next, I used my Jenni Bowlin ink with a Ranger blending tool and foam applicator to add ink to the embossed surfaces of the unfinished tag. 
Tip: When using a blending tool remember to always start off the actual surface you're going to be adding ink to and bring the applicator onto the project's surface using a slight circular motion with your wrist/applicator. This will help prevent applicator lines on your project.
I used a Crop-a-dile to easily punch holes through the top of the tag and ran ribbons through the holes.  I used flowered punches for the flower shapes and small tag on the tag above. Use pop dots between layers for eye-catching dimension.
To create a more masculine tag use Echo Park papers from their "Note to Self" collection along with heavy metal brads, twill, clock and gear embossed images (Ranger) and attach it all to the chipboard base using the Tim Holtz tiny attacher. 
Technique: use the pad directly onto the project's surface for a harsher less subtle look.
Tip: Ink the edges of the tags with the actual ink pad. I used Jenni Bowlin's Fountain Pen on these two masculine tags. 


Posted Image
Markers: Copic
Stamps: Stamp School Men in My Life, Studio Claudine Hellmuth "So Retro", Stampendous Blossom Brackets
Embellishments: Queen & Co. Brad, Theresa Collins Brad
Misc.: Ribbons & Pop Dots


Sunday, June 24, 2012

Copic Card Class: Wednesday, July 25, 2012 6-8pm


Create five cards using Authentique's newest line of papers & die cut stickers: Glory! We will be using several techniques to create dimention, texture, pocket cards (2), and more. 


I will have all necessary markers needed for class available to use if you don't own them all-so please don't hesitate to register for class by calling The Scrapbooking Studio at 309-736-7242 to register for your place in class. The cost is just $19/kit and it includes everything you will need to create a birthday, All-American Girl, All-American Boy, Liberty Themed, and Sweet Summertime cards using the basic coloring technique, feathered blending, coloring on canvas, coloring on Prima paper flowers, creating dimensional stars, and more. Each student will receive instructions and photos of project. 


Register for class today! Seating is limited due to availability of some supplies. 
Date: Wednesday, July 25, 2012 6-8PM
Place: The Scrapbooking Studio, Moline, IL
(309) 736-7242

Cost: $19/kit


Class Supplies student should bring with them: The Following Copic Markers: R24, R27, R29, R30, R35, R39, B41, B45, E31, E33, E35, E79 (I will have mine available for students to use as well). Atyou Spica Glitter Pens: Baby Blue, Blossom, Sharp Pointy Scissors, Tim Holtz scissors, sticky dots, pop dots, favorite adhesive.

Thanks for taking a peek!

Friday, June 22, 2012

{Cards} MME On the Sunny Side


Love making adorable cards? Yeah, me too! Shelly here with a peak at some great stamps available NOW at The Scrapbooking Studio along with a great line of papers from My Minds Eye: On the Sunny Side
I created this card with a A2 size base with the fold at the top (so it measures 5 1/2 " wide by 4 1/4" tall). Lawn Fawn "gnome sweet gnome" stamp collection, pennant cut using a Spellbinder's die and it flies from a Maya Road posie. I used Pebbles chalk PENCILS to color in the handsome gnome. This card might be too cute to give away :)
There's nothing like the sound of the ice cream truck in the summer! The one in our neighborhood always blasts the tune "The Entertainer" from it's speaker. This is an A2 size card as well, except this time the fold is on the left. I've used one of the pieces from the  Accessories sheet for the ice cream truck flowers and pennant pieces, an embossing folder on Tim Holtz Nostalgia Kraft Core cardstock, and a piece of ribbon for the "road".
This scooter from the Accessories sheet just says, "Little Boy" to me. I created the awesome tread marks using the stamp from Stampers Anonymous Tim Holtz Collection: Road Trip. I used Basic Gray glass brads for the hub caps on the scooter's wheels and a button on the pinwheel just to add even more fun.
Check out all the newest goodies at The Scrapbooking Studio, Moline, IL!

Friday, June 15, 2012

{Sale} AWDML Jenni Bowlin Ink!!!


Posted Image


Jenni Bowlin for Ranger inks are a great addition to any collection due to the wonderful smaller size pads that fit very comfortably in your hand. The raised felt pad works great for inking edges directly from the pad to project (as I used it on my card project below). The inks are Acid Free Dye Ink pads available is several colors. They are great to use directly onto stamps for inking, pad to paper techniques and brayering. 

{Layout} MME On the Sunny Side


Wondering what new great collection to pick up the next time you're at The Scrapbooking Studio? Shelly here with a great suggestion: why not check out this cheery new line from My Minds Eye?
My Minds Eye's new line On the Sunny Side is a wonderfully happy summer collection that works GREAT for masculine and feminine layouts! This is a fun picture the photographer snapped of my nephew and his groomsmen on their way to the wedding ceremony in August 2011.  This collection of heavy double sided patterned papers and the subtle color hues seems to match so much in all of my pictures. It also gave me a ton of options. You'll want to grab a sheet of the accessories too to have the perfect embellishments on hand:
Here's a look at the whole collection:
Sunnysideaccessories
Thanks for checking it all out! It's available NOW at The Scrapbooking Studio, Moline, IL